If you are a skincare freak who loves to try different skincare routines and therapies then you will try plasma pen therapy which is very effective for anti-aging and tightens your skin which is a dream for women above thirty. You can do this treatment both at the dermatologist’s clinic and also at home. But it is always recommended to do it under professional assistance. But if you want to try this at home then keep reading our how to use a plasma pen writeup.
What’s A Plasma Pen?
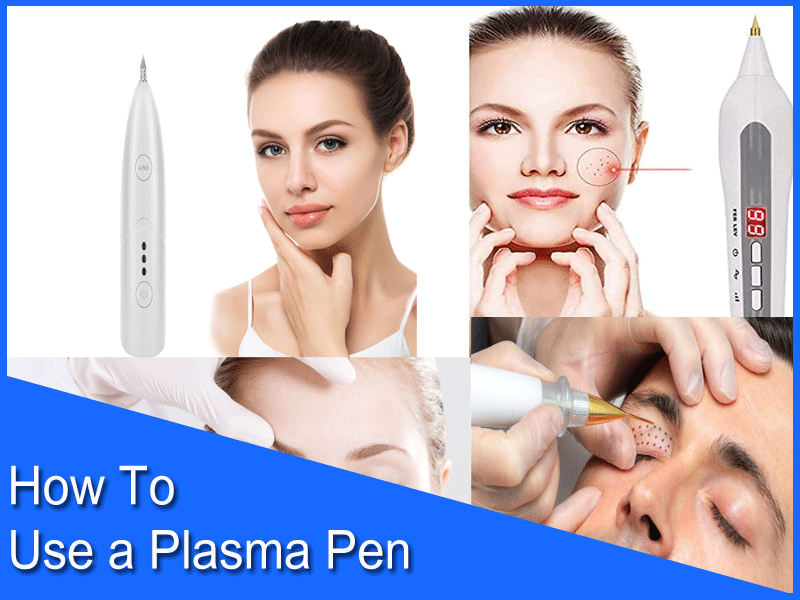
Plasma pen is also known as fibroblast therapy or fibroblastic. Plasma pen is a non-invasive treatment that aims to improve the look of wrinkles, fine lines, and saggy skin, that’s why it’s called fibroblast therapy.
It aims to target fibroblasts. Fibroblasts Plasma pens are the call type and the deeper layers of the skin that produce collagen. Many of you might know that with age and time we lose collagen in the deeper layers of the skin and that is what leads to wrinkles and saggy skin.
Like laser resurfacing or micro-needling, the goal of the plasma pen is to trigger the healing pathways that lead to fibroblasts making new healthy collagen.
What’s In A Plasma Pen?
The plasma and the plasma pen refer to the fact that the pen converts electrical energy into plasma. Inside a plasma pen, there are nitrogen and oxygen gases that desiccate the top epidermis promoting contraction and stimulating those healing pathways deep down in the skin.
That’s why it’s called a plasma pen because you’re targeting those areas and you’re using that fourth state of matter plasma. When you use this pen, it creates uniform rows of tiny little burn marks that stimulate healing pathways deep down.
Where Can You Use A Plasma Pen?
It’s good to use a plasma pen in small areas but because of the nature of the way the pen is used, it’s difficult to use it in large areas. So it’s used for the smaller areas in your face like around the eye, around the mouth for like smoker’s lines, i5t’s used for the crow’s feet. To the marionette lines, smile line, etc.
How Long A Plasma Therapy Takes?
The procedure lasts anywhere from 10 to 45 minutes depending on the size of the site that you’re having treated. Because this procedure is painful so you’re going to have numbing cream put on first.
Once the skin is numb then the provider is going to use the pen to deliver energy in a dot grid fashion to the skin and after the procedure, they’re going to apply plain petrolatum.
How To Use A Plasma Pen
These are different tips that come with a plasma pen and you have to use the tip according to the area you’re going to use it and also on the type of treatment you’re going to be giving or taking.
For example, to do a skin tag you’ll need the finest and smallest tip that you have because a skin tag is pretty small. To assemble a plasma pen follow the steps down below:
Step 1
To get started you have to wash your hands and put on your gloves first, which is mandatory. Cleanliness here is very important to reduce any possibility of infection and contamination. Inside the box, you have the pen, a USB charger, the needles, and the charger.
Step 2
Now it’s time to put the needle into the pen. There is a base for the needle which gets screwed onto the tip. So take the end of the needle and slide it into the pinwheel and then place this into the end of the pen and screw it clockwise. If you are targetting a larger area to the face then use the pencil-looking end.
Step 3
The pen has ten different settings. It’s really easy to put on and maneuver. Now press the on button and hold it for three to four seconds and you’ll see a little light pop up and this is where you can adjust how strong the plasma pen is.
It’s best to start with a one or a two when you first start using it and then you can build it up. Here press the plus button to go up and the minus button to go down.
Step 4
When you have chosen the correct setting all you do is press the button to use the plasma pen and take your finger off the button and your charge will stop.
Using Method Of A Plasma Pen
When you are done assembling the pen and have chosen your desired setting it’s time to apply it to the face or your problem area. Even if you have a very high pain tolerance always start by using some numbing cream on that specific area you’re going to use a plasma pen on.
After a couple of minutes wipe off the numbing cream. Now take your plasma pen and use a dotting motion with the needle touching the skin lightly and you’ll see baby dots start to form. Here you have to kind of stagger the dots a little bit.
By doing a very small amount of energy in a series of treatments you can get surgical-like results without a trace and that’s the goal. Make sure to pull the skin gently where you’re using the pen to have a good look at the area.
When you’re done use a q-tip to take off some extra skin and s\disinfect they are when you’re done and let it heal on its own.
You might also like:
- How Long Does Gel Stain Take To Dry
- How To Stain Acacia Wood
- How To Remove Facial Hair While On Accutane
- How To Drain A Coleman Pool
- How to Clean Otterbox Case
- How To Get Kief Out Of The Grinder
Final Verdict
If you want a great long-lasting tightening effect on your face there is no comparison with a plasma pen that works permanently and you don’t even have to go through it regularly. We hope the information we’ve shared in our how to use a plasma pen article has helped you educate better.