Having a built-in police gear rack is like a cherry on top for every law enforcement officer. It adds more emotions if you make one for your loved ones who can use one of these racks. So follow our step-by-step guideline of How To Build A Police Gear Rack to make the most wonderful piece you’ve ever made.
What A Police Gear Rack Has?
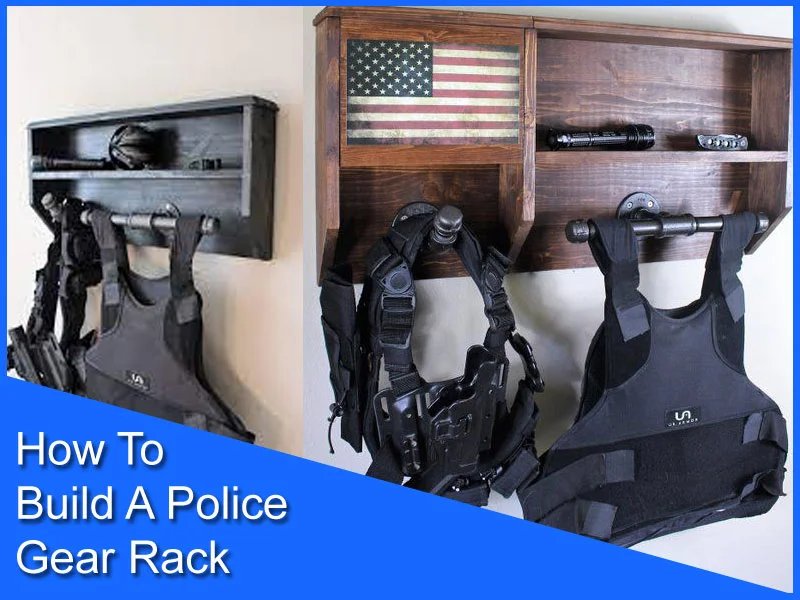
A police gear rack is also known as a gear holder or cop stand or cop valet which can be made with wood or metal and comes in different shapes and sizes. But the compartments are very specific and the same for all of them.
Usually, there is a holder to keep the cop belt, a jacket compartment, a holder for the walkie, and most importantly a locker or a lockbox where cops can put their weapons and lock them. There can be more compartments in a police gear rack but these are the mandatory ones.
These kinds of racks are used to organize the most important things that an on-duty police officer might need when they are in a rush. They can just go in front of the rack and all of their belongings are ready to use instantly.
These racks also take less space and keep all the things off the floor. These kinds of racks can be custom built and they make a nice gift for your police friends or family members. You can also add their name to it with other decorative details.
7 Best Ways How To Build A Police Gear Rack
How To Build A Police Gear Rack, we are going to discuss here has a duty belt holder on the left side and on the right side, there is a vest holder. These racks are meant to be used as decorative pieces and are also very useful.
On the top shelf, there will be a locker box, a hook for hats, and whatnot. They are pretty easy to make on your own if you have the right tools and proper knowledge. So if you are also eager to make one for yourself or someone else then follows the steps down below:
Step 1: Make A Layout
Before building a customized police gear rack you always have to start by designing a layout of that rack with measurements so you know what tools you’ll need, how much material you need to buy, what things will go into the rack, etc.
Step 2: Collect Tools And Rack Materials
To built a gear rack you’ll need a hammer, nails, clamps, electric saw, measuring tape, marker, 2X4 wood slats, wood glue, etc. if you prepare before you start building then there will be no extra hassle for you when you are working.
Step 3: Implement The Measurements On The Wood
Now it’s time to use a measuring tape and a marker to transfer different measurements of different compartments that you have added in your design and mark every piece so you don’t get confused later.
Step 4: Woodcutting
Now when you are done marking the measurements use a miter saw to cut the larger wood slats which are going to be your racks back, then gradually cut the smaller pieces. Use a circular saw to make any holes needed.
Step 5: Joint The Cut Pieces
When you are done cutting your wood pieces accordingly it’s time to attach them. Here you can use a hammer or a drill to nail down the pieces. For the back part join the largest pieces together using some wood glue and clamp both the pieces tightly so the joint gets nice and hard.
In the meantime assemble the smaller pieces which are going to be used for the compartments. Now first set them accordingly on to your working desk and then glue them together. You also need to drill in smaller nails to make the joints stronger.
When the rack’s back part is all dried up place it onto your workbench flat and keep the already made compartment piece on top. This will give you an idea of where you have to go next. Make sure the weapon locker compartment is on the right top corner and the box should be accurate and not biggest or smaller than the locker.
Now attach a metal hanger where the vest will be placed, a few hooks for keys, hat, etc. here the number of compartments and additional attachments depends on you. So you can customize accordingly.
Step 6: Sand, Polish, And Stain
When you are done gluing and screwing all your compartments its time to sand the whole surface so there is no uneven area left. For sanding first use an 80-grid and shift to a 220-grit to smooth out the wood surface.
If you have worked with wood then you might know about gel polish which also helps stain your wood. So for this gel polish is a good option. Apply 2 to 3 coats evenly and let the polish dry fully. Then it’s time to add a top polyurethane coat to help protect and shine the gear rack overall and let it dry again.
Step 7: Give Final Touches
Now it’s time to add some final touches to your gear rack like installing the lockbox and fixing it permanently by drilling down with nails. You can add power cords on the sides if you want.
As these racks are supposed to mount on a wall attach two wall mount brackets one at the top and the other on the bottom. Lastly, check all the fittings, again to see if anything needs fixing. You can also add some decorative pieces like pictures or flags or any special symbols if you want.
You might also like:
- Can You Have Two Different Accent Chairs In A Living Room
- How To Clean A Chimney Without A Brush
- How To Take Out Nose Stud With Flat Back
- How Far Can You Move A Kitchen Sink
- What To Put Between Two Accent Chairs
- How To Drill Through Rebar In Concrete
Final Verdict
If you’ve decided to make a customized gear rack by using our step-by-step guideline of how to build a police gear rack we appreciate that and hope this article is helpful to you.