Even tile edges are the mark of a professional tile installation. However, it can be quite challenging and time-consuming even for professionals. That’s why you need a perfect professional for the perfect job done. An experienced tiler knows how to install different material tiles installation and also knows How To Fix Lipping Tiles.
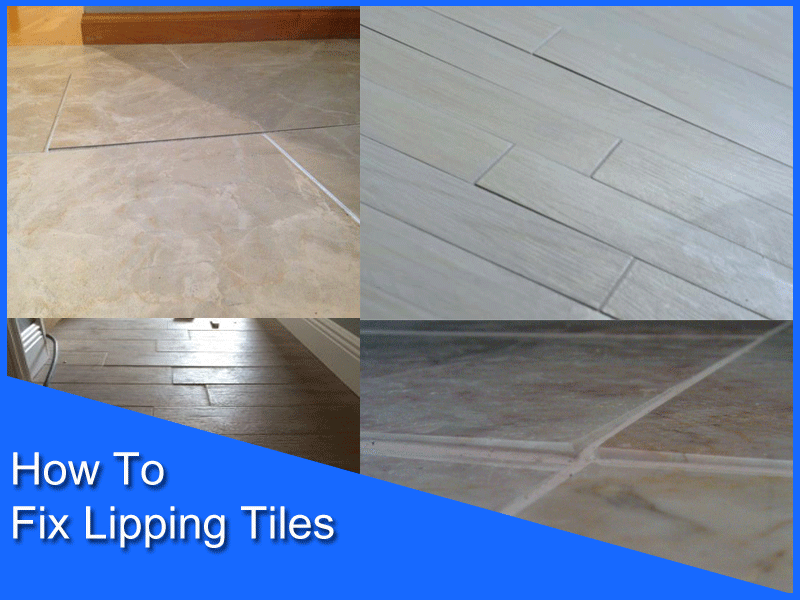
What Is Tile Lippage?
Lippage is when tiles are set and when any one of that tiles is raised, even just a little than the other tile in front of it, behind it, to the left, or to the right that’s called lippage. And the best way to test is to see if you have a straight even lippage free floor is just taking a coin and just through it across. You’ll surely know if there is any lippage or not.
The Problem That Tile Lippage Can Cause
If you have a lipping tile, there are tons of problems that you can face after some time. Like-
- Lipping in your tiles can cause the tiles to crack or chip when you’ll put pressure on them. Because the tiles are not leveled properly
- The lipping tile corners can catch your socks while you’re walking by
- You can cut your feet with the corners of your tiles pretty easily
- It is very difficult to move your furniture from one side to another on an uneven tile floor
- A lipping tile does not reflect the sunlight or any sort of light the way it should be which can frustrate you
- It also makes your tile design seem not very satisfying at all
Causes Of Tile Lippage
There are several reasons that cause your brand new tiles to lip. Like-
- If you try to install your tiles without the proper knowledge, tools, and exact machinery it can cause lippage pretty easily.
- Sometimes your tile installation company that you chose also causes that lippage with their poor installation work
- Sometimes an uneven or unlevelled sub-floor can cause your tiles to lip
- The tiles that you choose can also cause lips, especially if you choose poor quality tile for your floors or inconsistent tile variation can also cause problems
- Not leaving proper gaps between the tiles causes lippage because it won’t allow your tiles any room to expand at times and will crack or come out on top of another tile
- Large-sized tiles may look pleasing but they are very hard to install and easy to crack or lip off
- Your tile patterns are also responsible for lippage
- Choosing natural tiles but not choosing the perfect tiler for the job. Natural tiles tend to sink after installation, they are very heavy and it requires a lot of preparation work before installation
- Not grinding the tile surface properly also causes lippage
- Buying uncelebrated tiles
How to Fix Lipping Tiles
There are several ways to fix or avoid tile lippage and tools that can help you install a perfectly flat tile. Here we are going to discuss two types of tile leveling systems. Like-
Using A Rigid Spindle System
First, insert the white base; two inches from the corners and about every ten inches. Set the next tile and then twist and cinch the cap till it is snug. The base will create a 1/16 grout joint between tiles while the cap and base hold the tiles securely.
For a larger grout joint simply use spacers in conjunction with the leveling caps. When the thin-set is cured gently kick the caps to remove them. Next sweep them up and remove the broken stems so they’re ready for use again.
Using A Wedge System
First slid the clip behind the tile and continue to install it. Make sure the tiles are nice and tight. Now install the wedge. For this, you don’t need pliers necessarily. You can tighten the widgets with your hands but if you’re installing a tile for a shower and you’re using a ton of wedges and clips; your hands and fingers will get sore.
So recommend you buy a pair of pliers. They are pretty universal. Use the pliers to tighten the wedges. Make sure to clear out the excess mortar that might come out. And continue to install. Sometimes you have to hold the edges of your tiles when you insert the wedge. Sometimes it’ll separate the tiles from each other. So hold one end as you insert the wedge and tighten down the pliers.
Final Verdict
When you’ll use any of these leveling systems you’ll understand How to Fix Lipping Tiles and how they give you much cleaner, flatter, and superior-looking tiles for your home. They are inexpensive and they work well. So we hope you’ve got your solution and If you did let us know.
You might also like:
- How To Fix A Bathtub Faucet That Broke Off
- How To Vent A Basement Sink
- How To Remove Cool Deck Coating
- How Wide Should A Nightstand Be
- How To Make A Bunk Bed Ladder Cover
Frequently Asked Questions (FAQ)
Can Tile Lippage Be Fixed?
Yes, tile lippage can be fixed. There are a few different ways to fix lippage, depending on the severity of the problem. For minor lippage, you can use a sanding block or screen to sand down the high spots.
For more severe lippage, you may need to use a power sander. If the lippage is really bad, you may need to replace the tile altogether.
What Does Lipping Mean In Tiling?
When it comes to tiling, lipping refers to the process of creating a decorative edge or border around the perimeter of a tile project. This can be done using a variety of materials, including metal, wood, or stone.
Lipping tiling is a great way to add a touch of personality to your tile work and can really make a space pop. Plus, it’s a relatively simple process that can be completed by even the most novice of do-it-yourselfers.
How To Hide Tiling Mistakes
If you’re not happy with the way your tile installation turned out, don’t despair. There are several ways to cover up tiling mistakes so that they’re not immediately noticeable.
One way to cover up tiling mistakes is to use grout. You can use a different color grout than what was used originally, or you can mix grout with paint to create a custom color. Be sure to apply the grout or grout/paint mixture evenly so that the mistake is not as noticeable.
Another way to cover up tiling mistakes is to use caulk. Caulk comes in many colors, so you can choose one that closely matches the color of your tile. Again, be sure to apply the caulk evenly so that the mistake is not as noticeable.
You can also use tile adhesive or epoxy to cover up tiling mistakes. Tile adhesive and epoxy come in many colors, so you can choose one that closely matches the color of your tile. Be sure to apply the tile adhesive or epoxy evenly so that the mistake is not as noticeable.
If you’re not happy with the way your tile installation turned out, don’t despair. There are several ways to cover up tiling mistakes so that they’re not immediately noticeable. With a little effort, you can make your tile installation look just the way you want it to.
How To Fix Uneven Tiles On Wall
If your tiles are uneven, it’s likely because they were not installed properly. You can fix this problem by following these steps:
- Remove the tile that is higher than the others. Use a chisel and hammer to loosen it, then pry it off the wall.
- Apply mortar to the back of the tile and set it in place. Use a level to make sure it is even with the other tiles.
- Repeat this process for any other uneven tiles.
- Once all the tiles are level, apply grout between the joints. Wipe away any excess grout with a damp sponge.
- Allow the grout to dry completely before using the area.