Installing cabinet shelf clips is a simple and straightforward process that can help you organize and maximize storage space in your cabinets. These clips are used to secure shelves in place, preventing them from sliding or sagging under the weight of items.
To install cabinet shelf clips, you’ll need a few basic tools and a little patience. In this guide, we will walk you through the step-by-step process of installing cabinet shelf clips, ensuring a sturdy and functional storage solution for your cabinets.
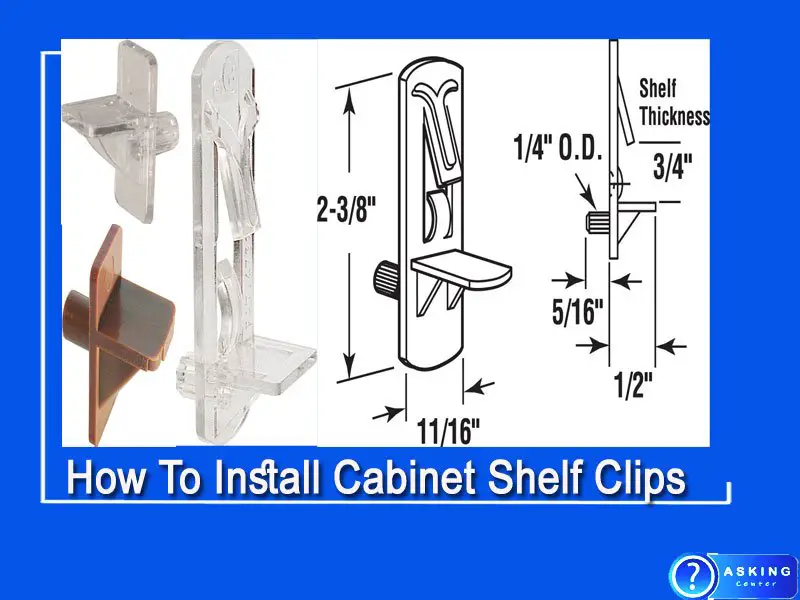
How To Install Cabinet Shelf Clips
In this comprehensive guide, we will take you through a step-by-step process of How To Install Cabinet Shelf Clips effectively. With a few basic tools and careful measurements, you’ll have sturdy and adjustable shelves in no time.
install cabinet shelf clips, you will need the following materials:
- Cabinet Shelf Clips: These can be purchased from hardware stores or online, and they come in various sizes and styles to fit your specific cabinet.
- Measuring Tape: This will help you determine the proper placement and spacing of the shelf clips.
- Pencil: You’ll need a pencil to mark the locations where the shelf clips will be installed.
- Screwdriver or Drill: Depending on the type of shelf clips you have, you may need a screwdriver or a drill to secure them in place.
- Level: A level will ensure that your shelves are installed evenly and horizontally.
- Safety Glasses: It’s always a good idea to wear safety glasses to protect your eyes when working with tools.
Make sure you have these materials ready before you begin the installation process to ensure a smooth and efficient setup of your cabinet shelf clips.
Step 1: Gather the Required Materials
Before you begin, gather all the necessary materials. You will need cabinet shelf clips, a measuring tape, a pencil, a screwdriver or drill, a level, and safety glasses. Having everything on hand will ensure a smooth and efficient installation process.
Step 2: Measure and Mark the Placement of Shelf Clips
Start by measuring the desired height for your first shelf and mark it with a pencil on both sides of the cabinet’s interior walls. Ensure that the marks are level by using a level tool. Measure and mark the desired spacing between each shelf clip. This will depend on the height and number of shelves you plan to install. Aim for an equal and balanced arrangement.
Step 3: Position and Secure the Shelf Clips
Take the cabinet shelf clips and align them with the marked positions on the cabinet walls. For shelf clips with screws, use a screwdriver or drill to secure them firmly into place. Ensure that the clips are level and tightly fastened to provide adequate support for the shelves. Repeat this process for each marked location.
Step 4: Insert the Shelves onto the Clips
Once all the shelf clips are installed, it’s time to insert the shelves onto them. Align the shelves with the clips, ensuring a snug fit. Gently push the shelves down onto the clips until they are secure. Test the stability of each shelf by applying slight pressure to confirm that they are properly seated on the clips.
Step 5: Adjust and Fine-Tune
If necessary, make adjustments to the height or level of the shelves. Some shelf clips allow for height adjustments by simply sliding them up or down. Use a level tool to ensure that all shelves are horizontally aligned. This step is crucial to avoid any imbalance or items rolling off the shelves.
Step 6: Test the Stability
Once all the shelves are installed and adjusted, it’s important to test their stability. Apply some weight or gently place items on the shelves to ensure they can handle the load without any wobbling or tilting. If any issues are detected, make further adjustments to improve the stability.
Step 7: Repeat for Additional Shelves
If you plan to install multiple shelves in the cabinet, repeat the above steps for each additional shelf. Take accurate measurements, mark the positions, install the shelf clips, and insert the shelves onto them. Maintain consistency in spacing and levelness for a neat and organized cabinet interior.
Step 8: Final Check and Finishing Touches
After all the shelves are installed, give the cabinet a final check. Ensure that the shelves are secure and stable and that the spacing and levelness meet your requirements. Clean the cabinet interior and remove any debris or pencil marks for a clean finish. Now you can start organizing your items on the newly installed shelves.
Conclusion:
Installing cabinet shelf clips is a straightforward process that can greatly enhance the functionality and organization of your cabinets. By following this step-by-step guide, you can install shelf clips with ease, allowing you to customize the height and arrangement of your shelves. Remember to measure accurately, use a level for precision, and test the stability of the shelves before loading them with items. With proper installation, you’ll enjoy sturdy and adjustable shelves that maximize your cabinet storage space.
How To Install Plastic Shelf Clips
Installing plastic shelf clips is a relatively simple task that can be completed in just a few steps. To begin, measure the width of your shelf and then mark the desired location for the clip. Next, drill two holes into the wall for each clip using an appropriate size bit.
Finally, insert screws into each hole and fasten them securely with a screwdriver or power drill to hold the clips firmly in place. Once all of your clips are installed, you can easily attach shelves to them and enjoy their many benefits!
How To Install Pilaster Shelf Clips
Installing Pilaster shelf clips is a quick and easy task that can be completed in just a few steps. The first step is to measure the width of your shelving unit and cut the pilasters to fit. Next, you will need to position the pilasters on either side of your shelf and mark their locations with a pencil or marker.
Finally, use an appropriate drill bit size for the screws provided with your Pilaster Shelf Clip kit, then attach them using the screws provided in your kit. Once done, these clips will securely hold your shelves in place!
How To Install Shelf Supports
Installing shelf supports is a straightforward DIY process. To begin, you will need to measure the wall or cabinet where you plan on installing your shelves and mark off the appropriate location for each support. Next, use an anchor (such as toggle bolts) to secure the brackets in place.
Once your brackets are firmly secured to the wall or cabinet, simply slide your shelf into position and it should be securely held in place!
How To Adjust Cabinet Shelves With Plastic Clips
Installing and adjusting cabinet shelves with plastic clips is a simple task that can be done with minimal effort. To adjust the shelf height, simply locate the plastic clips on either side of the shelf and slide them up or down to your desired level. Once you have adjusted both sides of the shelf, secure it in place by pushing each clip back into its original position.
With just a few minutes of work, you can easily customize your kitchen cabinets to fit any storage need!
Types of Shelf Supports
Shelf supports are important components of any shelving unit, as they provide the structural support necessary for a safe and secure shelf. There are several types of shelf supports available, including plastic brackets, metal clips, wood dowels, and even hidden floating shelves that don’t require visible hardware.
Depending on the look you’re going for and the weight requirements of your shelves, there is likely a type of shelf support to meet your needs.
How To Install Adjustable Shelves in Cabinets
Installing adjustable shelves in cabinets is an easy and effective way to maximize the storage space in your home. Adjustable shelving allows you to customize the shelf heights, making it possible to fit a variety of items into one cabinet. To install adjustable shelves, start by measuring the interior of the cabinet and purchasing shelves that are slightly smaller than these measurements.
Securely attach brackets onto each side of the cabinet walls with screws or nails, then slide each shelf onto its bracket to finish the installation. With adjustable shelves in place, you can now make use of every inch of available storage space!
How to Install Shelf Pin Sleeves
Installing shelf pin sleeves is a simple process that will only take you a few minutes. First, measure the distance between each shelf and mark it on the wall with a pencil or marker. Next, find the studs in your wall by tapping along with your fingers until you hear a solid thud – this indicates that you have found one.
Once all of the studs are marked, place the shelf pin sleeve against them and secure them into place using screws or nails. Finally, insert pins into each hole of your sleeve and adjust them to fit snugly against your shelves before locking them securely in place. With these easy steps, you’ll be able to quickly install shelf pin sleeves for your next project!
How To Fix Loose Shelf Pins
To fix loose shelf pins, the first step is to locate them and make sure they are still in good condition. If not, replace them with new ones. Once you have the right pins, use a hammer to drive them into place firmly against the wall of your cabinet or shelving unit.
If necessary, add an extra pin for further support. Finally, check that all shelf pins are secure before placing any items on your shelves. With these simple steps, you can easily fix loose shelf pins!
How Do You Install Shelf Support Clips?
Shelf support clips can be easily installed with a few simple steps.
• Check the weight of the shelf and select an appropriate clip size.
• Match up the holes on the clip to those in your shelf bracket and secure them using screws.
• Place the clip on top of your wall studs making sure that it is mounted securely.
• Attach your shelf to the clip, ensuring that it fits correctly into place.
Finally, use a level to ensure that your shelves are even before you tighten all screws for added stability.
How Do You Install Cabinet Shelf Supports?
Installing cabinet shelf supports is simple and straightforward.
Here are the steps to follow:
• Measure: Determine where the shelf should be, then measure and mark its location.
• Drill holes: Use a drill bit slightly smaller than the size of the support screws.
• Insert anchors: If applicable, insert plastic wall anchors into each hole drilled.
• Attach brackets: Securely attach each bracket to the back of your cabinet with screws.
• Install shelves: Place shelves onto brackets and tighten any necessary screws or pins.
With these steps you can easily install new cabinet shelf supports in no time!
How Do You Secure Cabinet Shelves?
Secure cabinet shelves by doing the following:
* Using shelf brackets and screws to secure them in place.
* Choose fasteners that are appropriate for the type of material used for the shelves.
* Measure twice before drilling to ensure accurate placement.
These simple steps help ensure your cabinet shelves stay safe, secure, and stable.
Conclusion
Installing cabinet shelf clips is a fairly simple task that can help to improve the functionality of your cabinets. With just some basic tools and supplies, anyone can easily install these shelf clips in their cabinetry. By installing them appropriately, you’ll be able to securely hold any shelf into place while adding extra support to your storage spaces.
Doing so will ensure that both the shelves and cabinets last longer and remain safe for years to come!