If you’re living in an old house or an apartment with an old kitchen sink then with many other problems, you might also face problems in the kitchen. One of those nasty problems can be with the sink specifically.
The most frustrating thing with old kitchen sinks is their peeling caulk sealants, pulsating faucet, low-pressure of water, etc.
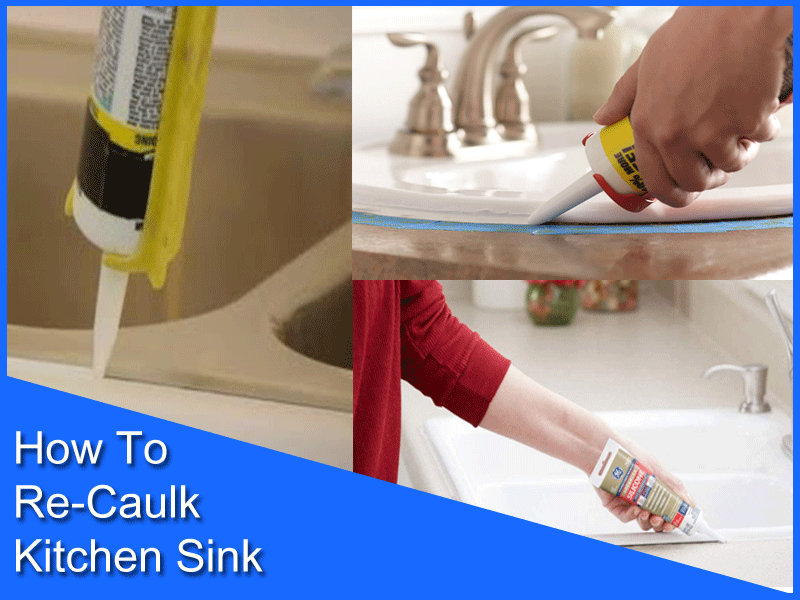
So if you are facing any of these sink problems, especially the caulking problem then we will tell you How to Re-Caulk Kitchen Sink using simple tools and with less effort. Usually, caulk sealants can stay put for 3 to 5 years but that totally depends on how you use your sink.
How To Re-caulk Kitchen Sink | 5 Easy Steps
A kitchen sink is a crucial part of any home, and over time, the caulking around it can become worn, cracked, or discolored. Re-caulking your kitchen sink is a simple and affordable DIY project that can make a big difference in the look and functionality of your kitchen. In this article, we will guide you through the steps of How To Re-caulk Kitchen Sink.
Materials Needed:
- Caulk gun
- Silicone caulk
- Caulk smoothing tool
- Razor blade or utility knife
- Rubbing alcohol
- Clean rag or paper towel
Step 1: Remove the Old Caulk Start by removing any old caulk around your kitchen sink. Use a razor blade or utility knife to cut along the edges of the caulk and then peel it away. Make sure to remove all of the old caulk to ensure a clean surface for the new caulk to adhere to.
Step 2: Clean the Area Clean the area around your kitchen sink with rubbing alcohol to remove any remaining caulk or debris. Use a clean rag or paper towel to wipe away any residue and ensure the area is completely dry.
Step 3: Apply the New Caulk Load the silicone caulk into the caulk gun and apply a small bead of caulk around the perimeter of the sink. Make sure to work in small sections, as silicone caulk dries quickly. Use a caulking smoothing tool to smooth the caulk into place and remove any excess.
Step 4: Allow the Caulk to Dry Allow the caulk to dry for at least 24 hours before using your sink. Keep in mind that the drying time may vary depending on the temperature and humidity in your home.
Step 5: Inspect and Touch Up Inspect the caulk after it has dried to ensure it is fully sealed and there are no gaps or bubbles. If you notice any imperfections, use a razor blade or utility knife to carefully remove and reapply the caulk.
In conclusion, re-caulking your kitchen sink is an easy and affordable DIY project that can help to maintain the functionality and aesthetics of your kitchen. With these simple steps and the right materials, you can re-caulk your kitchen sink in no time.
Process of Removing Old Caulk
Look closely around the rim of your old kitchen sink and if you see really mold, mildew, or moldy old sealant then you should consider removing that old caulk and redoing it.
Now first you have to scrape the old caulk in a way kind of cleans it up as best you can and use a nice little scraping blade so you can scrape out the old caulk from nooks and crannies.
You can also use a blow dryer to soften the sealant so it gets loose enough to be scraped easily. If you don’t scrape the old caulk properly the new one will not adhere properly. Make sure to clean and keep the area dry naively for re-caulking.
How To Caulk A Drop-in Kitchen Sink
If you’re planning on caulking your drop-in kitchen sink, there are a few things you’ll need to do in order to make sure the job is done properly. First, you’ll need to clean the area around the sink thoroughly. Any dirt or debris will make it harder for the caulking to adhere properly.
Next, you’ll need to apply a layer of painter’s tape around the edge of the sink. This will help create a clean, straight line for the caulking.
Finally, you’ll need to apply the caulking itself. A good tip is to use a caulking gun to make the process easier. Once you’ve applied the caulking, smooth it out with your finger and remove any excess. Allow the caulking to dry for 24 hours before using the sink.
How To Remove Silicone Caulk From Undermount Sink
Removing silicone caulk from an under-mount sink is a tedious and difficult process, but it is possible with the right tools and patience. Here are the steps to remove silicone caulk from an under-mount sink:
- Begin by scoring the caulk with a utility knife. Be sure to score the caulk all the way around the sink.
- Next, use a putty knife or razor blade to pry the caulk up from the sink. Start at one end and work your way around.
- Once the caulk is loose, use a paper towel or rag to wipe away any residue.
- Finally, use a mild cleaner and a soft cloth to clean the area where the caulk was removed.
What Is The Best Caulking To Use Around A Kitchen Sink?
Caulking is an important part of any kitchen sink installation. It helps to seal the edges of the sink and prevent water from seeping underneath. There are a variety of caulking materials on the market, so it is important to choose the right one for your kitchen sink.
Silicone caulking is a popular choice for kitchen sinks because it is waterproof and flexible. It can be used on a variety of surfaces, including metal, ceramic, and plastic. Silicone caulking is available in a variety of colors, so it can be matched to the finish of your sink.
Polyurethane caulking is another popular choice for kitchen sinks. It is less flexible than silicone but is more durable. Polyurethane caulking is available in a variety of colors, so it can be matched to the finish of your sink.
Acrylic latex caulking is a good choice for kitchen sinks because it is flexible and easy to work with. It can be used on a variety of surfaces, including metal, ceramic, and plastic. Acrylic latex caulking is available in a variety of colors, so it can be matched to the finish of your sink.
Caulking is an important part of any kitchen sink installation. It helps to seal the edges of the sink and prevent water from seeping underneath. There are a variety of caulking materials on the market, so it is important to choose the right one for your kitchen sink.
FAQ
Can You Put New Caulking Over Old Caulking?
It’s not uncommon for caulking to degrade and crack over time. If this happens, you may be wondering if you can simply put new caulking over the old caulking. Unfortunately, this is not generally recommended.
Old caulking can be difficult to remove, and if it’s not removed properly, it can create a barrier that prevents the new caulking from adhering correctly. This can lead to gaps and cracks, and ultimately, more work for you.
The best way to ensure that your new caulking will adhere properly is to remove the old caulking completely. You can do this with a putty knife or a utility knife. Once the old caulking is removed, clean the surface with alcohol or vinegar to remove any residue.
Then, you can apply the new caulking. Be sure to smooth it out with a wet finger or a putty knife, and allow it to dry completely before using the area.
How Do I Regrout My Kitchen Sink?
Your kitchen sink sees a lot of action. From washing hands to rinsing off dishes, it’s no wonder that the grout around your sink can start to look a bit grimy. If your grout is looking dirty or discolored, it might be time to give it a good cleaning.
Fortunately, regrouting your kitchen sink is a relatively easy DIY project. With a little time and effort, you can have your sink looking like new again.
Here’s what you’ll need to do to regrout your kitchen sink:
- Remove the old grout. Use a utility knife or grout saw to remove the old grout from around your sink. Be careful not to damage the tiles as you remove the grout.
- Clean the area. Once the old grout has been removed, use a tile cleaner or mild soap and water to clean the area around your sink.
- Apply the new grout. Add the new grout to the area around your sink, using a grout float to smooth it into place.
- Wipe away the excess. Once the grout has been applied, use a damp sponge to wipe away any excess.
- Allow the grout to dry. Let the grout dry for 24 hours before using your sink.
With these simple steps, you can easily regrout your kitchen sink and make it look new again.
How Do You Remove And Reapply Silicone Caulk?
silicone caulk is a great way to seal up gaps and cracks around your home. But what do you do when it starts to peel away or crack? You need to remove and reapply the silicone caulk.
Here’s how to do it:
- Use a utility knife or putty knife to score the caulk line. This will help the new caulk adhere better.
- Use a caulk remover or a heat gun to soften the old caulk.
- Use a putty knife or your fingers to remove the old caulk.
- Use a damp rag to clean the surface.
- Apply the new caulk.
- Use a caulk gun to apply the new caulk evenly.
- Use your finger or a putty knife to smooth the caulk line.
- Allow the caulk to dry for the amount of time specified on the caulk tube.
You might also like