Makeup sponges are a popular tool for applying makeup, but they can quickly become dirty and harbor bacteria if not cleaned regularly. Cleaning your makeup sponges is crucial for maintaining their effectiveness and ensuring your skin stays healthy. In this article, we will guide you through the steps to clean your makeup sponges properly, using simple yet effective methods that will leave them looking and feeling fresh.
How To Clean Sponge Makeup (Follow 5 Easy Steps)
Makeup sponges are essential tools for any makeup lover, but they can quickly accumulate bacteria, oil, and product buildup if not cleaned properly. Using a dirty sponge on your face can lead to breakouts, irritation, and even infections, so it’s important to keep them clean. In this article, we will guide you through the process of How To Clean Sponge Makeup to keep them in top condition.
Step 1: Rinse The Sponge
The first step to cleaning a makeup sponge is to rinse it thoroughly with warm water. This will help to remove any excess makeup and dirt from the sponge. Hold the sponge under the tap and gently squeeze it to allow the water to penetrate through the sponge’s surface. Be sure to rinse it until the water runs clear.
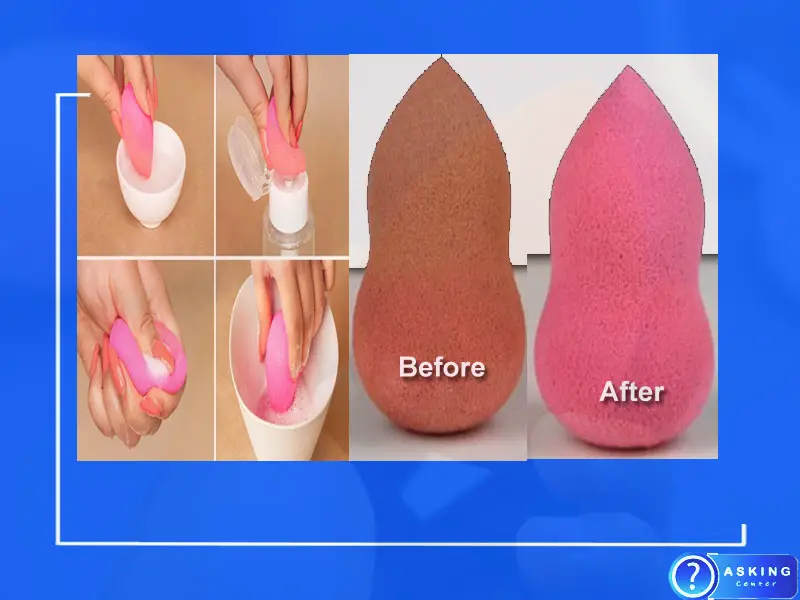
Step 2: Apply Cleanser
After rinsing the sponge, it’s time to apply a cleanser. There are a variety of cleansers on the market specifically designed for cleaning makeup sponges, but you can also use regular dish soap or a gentle facial cleanser. Squirt a small amount of the cleanser onto the sponge and gently massage it into the sponge’s surface.
Step 3: Work The Cleanser
Once you’ve applied the cleanser, it’s time to work it into the sponge. Squeeze and release the sponge repeatedly to create a lather and ensure that the cleanser penetrates through the sponge’s surface. Continue to massage the sponge gently for a few minutes to make sure that all the makeup and dirt is lifted from the sponge.
Step 4: Rinse And Repeat
After working the cleanser into the sponge, rinse it thoroughly with warm water until the water runs clear. If you can still see traces of makeup on the sponge, repeat the process until the sponge is completely clean. Be sure to squeeze out any excess water before moving on to the next step.
Step 5: Dry The Sponge
Once your sponge is clean, it’s important to dry it properly. Squeeze out any excess water from the sponge and then lay it out to air dry. Do not use a hairdryer or any other heat source to dry the sponge as this can damage the material. Allow the sponge to dry completely before storing it away.
Conclusion
Cleaning your makeup sponges regularly is essential to keep them in top condition and to ensure that your makeup application is flawless. By following these simple steps, you can keep your sponges clean, hygienic, and ready for use whenever you need them. Remember, a clean sponge is a happy sponge, and your skin will thank you for it!
Can You Wash And Reuse Makeup Sponges?
you can wash and reuse makeup sponges. In fact, it is recommended that you clean your makeup sponges regularly to prevent the buildup of bacteria, oil, and product residue. By following a few simple steps, such as rinsing, applying cleanser, working the cleanser, rinsing again, and air drying, you can keep your makeup sponges in top condition and ready for use. With proper cleaning and care, you can extend the life of your makeup sponges and ensure that they remain hygienic for safe use on your skin.
What Is The Best Way To Clean Makeup Brushes And Sponges?
The best way to clean makeup brushes and sponges are to first rinse them with warm water to remove excess makeup, and then apply a cleanser to the bristles or surface of the sponge. Gently work the cleanser in and then rinse until the water runs clear.
Allow the brushes and sponges to air dry completely before using them again. It’s important to clean makeup brushes and sponges regularly to prevent the buildup of bacteria and product residue, which can lead to skin irritation and breakouts. By following these simple steps, you can keep your makeup brushes and sponges clean and hygienic for safe use.
Best Soap To Clean Makeup Sponges
One of the most important tools in your makeup kit is a good-quality makeup sponge. Makeup sponges are great for applying foundation, concealer, and powder. But, just like any other makeup tool, they need to be cleaned on a regular basis.
Otherwise, they can become a breeding ground for bacteria. So, what’s the best soap to clean makeup sponges? The answer may surprise you…
Many people think that the best soap to clean makeup sponges is antibacterial soap. However, this is not the case. Antibacterial soap can actually be too harsh for makeup sponges and can strip them of their natural oils.
This can cause the sponges to become dry and brittle, which will shorten their lifespan. The best soap to clean makeup sponges is actually a gentle, fragrance-free soap. You can find these soaps at most drugstores or online.
Just make sure to rinse the sponges well after cleaning them, as residual soap can cause irritation. If you want to disinfect your makeup sponges, you can do so by boiling them in water for 5 minutes. Just make sure to let them air dry completely before using them again.
With a little care, your makeup sponges will last for months (or even years!). Just make sure to clean them regularly and replace them when they start to show signs of wear.
How To Clean Makeup Sponges With Vinegar
If you’re anything like me, you love makeup sponges. They make applying makeup so much easier and they help create a flawless finish. But as much as I love makeup sponges, I hate cleaning them.
It always seems like such a hassle. But it doesn’t have to be! With just a little bit of vinegar, you can easily clean your makeup sponges and get them looking like new again.
Here’s what you’ll need:
- 1 cup of vinegar
- 1 cup of water
- A bowl
- A clean makeup sponge Start by mixing the vinegar and water together in the bowl.
Then, simply submerge your makeup sponge in the mixture and let it soak for a few minutes. After a few minutes, take the sponge out and squeeze it out until it’s no longer dripping. And that’s it!
Your makeup sponge is clean and ready to be used again. So, the next time your makeup sponge is looking a little bit worse for wear, don’t reach for the trash can. Just grab some vinegar and give it a quick cleaning.
You’ll be glad you did!
How To Wash Makeup Sponges In The Washing Machine
Washing your makeup sponges in the washing machine is a great way to keep them clean and bacteria-free.
Here’s How To Do It:
1. Start by putting your makeup sponges in a mesh laundry bag. This will help to keep them from getting tangled up in your washing machine.
2. Set your washing machine to the delicate cycle and use a gentle detergent.
3. Once the cycle is complete, remove your makeup sponges from the mesh bag and allow them to air dry.
4. That’s it! Your makeup sponges are now clean and ready to use.
How To Clean Makeup Sponges And Brushes
If you’re anything like me, you love makeup. It’s a great way to express yourself and feel confident. But all that makeup can take a toll on your brushes and sponges.
Here’s a quick and easy guide on how to clean makeup sponges and brushes so they last longer and stay bacteria-free. For makeup brushes, start by wetting the bristles with warm water. Add a small amount of gentle shampoo and massage it into the bristles.
Rinse thoroughly and lay flat to dry. For sponges, wet the sponge and add a dollop of shampoo. Gently massage the shampoo into the sponge and rinse thoroughly.
Squeeze out any excess water and let the sponge air dry. With just a few simple steps, you can clean your makeup brushes and sponges and keep them bacteria-free!
How To Clean Makeup Sponge With Baking Soda
Most people use makeup sponges to apply foundation, concealer, and powder. However, over time makeup sponges can become filled with bacteria, which can lead to breakouts. Luckily, there is an easy way to clean your makeup sponge with baking soda!
To clean your makeup sponge with baking soda, start by wetting the sponge and then dipping it into a bowl of baking soda. Next, use your fingers to massage the baking soda into the sponge for a minute or two. Finally, rinse the sponge thoroughly with water and allow it to air dry.
If you do this once a week, your makeup sponge will stay clean and bacteria-free!
How To Clean Makeup Sponges With Olive Oil
If you’re anything like me, you love using makeup sponges to apply your foundation. They give you a nice, even finish and they’re just so satisfying to use! But after a few uses, they can start to get a bit grubby.
And let’s be honest, no one wants to use a dirty makeup sponge on their face! So, how can you clean your makeup sponges and keep them in good condition? One way is to clean them with olive oil.
Here’s how to do it:
1. Wet your makeup sponge with warm water.
2. Pour a small amount of olive oil onto the sponge.
3. Rub the sponge over your face in a circular motion.
4. Rinse the sponge with warm water.
5. Repeat steps 2-4 until the sponge is clean.
6. Rinse the sponge with cold water and allow it to air dry. That’s it! This method is quick, easy, and gentle on your sponge.
Plus, it’s a great way to reuse any leftover olive oil you have in your kitchen.
How Often To Clean Makeup Sponges
If you’re like most people, you probably don’t think much about your makeup sponge. But did you know that this little tool can harbor some serious bacteria? That’s why it’s important to clean your makeup sponge regularly.
So, how often should you clean your makeup sponge? Ideally, you should clean it after each use. But if that’s not possible, aim to clean it at least once a week.
To clean your makeup sponge, start by wetting it with warm water. Then, add a small amount of mild soap and work it into the sponge. Rinse the sponge well and squeeze out any excess water.
Finally, allow the sponge to air dry. If you notice that your makeup sponge is starting to smell bad, it’s a sign that it’s time for a deep clean. To do this, wet the sponge and add a small amount of baking soda.
Work the baking soda into the sponge and let it sit for a few minutes. Rinse the sponge well and squeeze out any excess water. Allow the sponge to air dry.
No matter how often you clean your makeup sponge, it will eventually need to be replaced. A good rule of thumb is to replace it every one to three months. So there you have it!
A few simple tips for keeping your makeup sponge clean and bacteria-free.
Conclusion
If you use a foundation sponge to apply your makeup, it’s important to clean it regularly. Otherwise, it can become a breeding ground for bacteria.
To clean your foundation sponge, start by wetting it with warm water.
Then, add a small amount of gentle cleanser to the sponge and work it into a lather. Gently massage the sponge all over your face in a circular motion. Rinse the sponge well with warm water and squeeze out any excess moisture.
Finally, let your sponge air dry on a clean towel. Make sure to clean your sponge at least once a week to keep your skin healthy and free of bacteria.
You might also like