If you work with metal long enough sooner or later you’re going to have to deal with damaged threads. Because thread repair is a problem in the industrial world there are some pretty good off-the-shelf solutions for this problem. How To Repair Damaged Pipe Threads? There are a lot of issues that might cause damage to your pipe threads like the lines of the thread might get extended, treads might cut, oftentimes with old pipes, they get so rusty that you have to change it, etc.
So if you are looking for this kind of solution to fix your broken pipe threads then we would say you need to read the whole process we explained here and get a good overview on how to repair damaged pipe threads the easiest way.
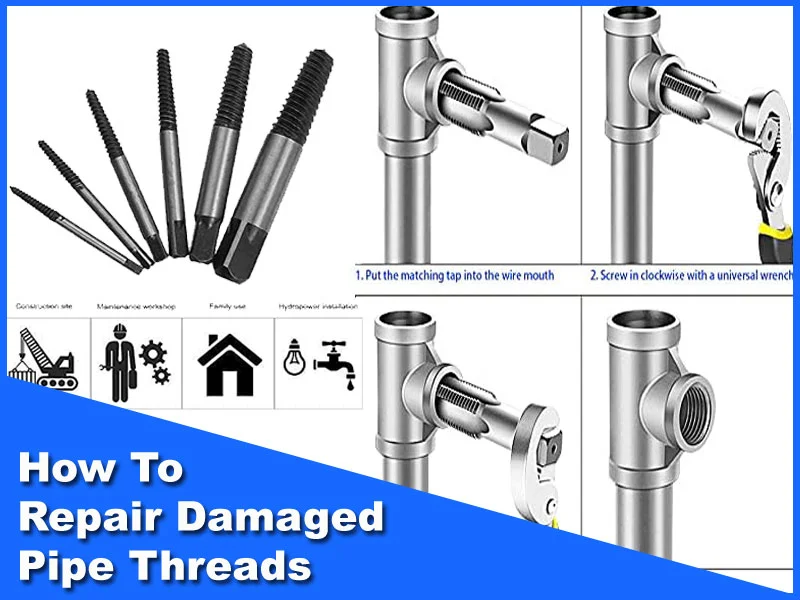
5 Steps Of How To Repair Damaged Pipe Threads
Before you jump into repairing your threads we would suggest taking a look at the whole situation so the repairing gets easier for you. Follow the steps down below How To Repair Damaged Pipe Threads.
Step 1: Cleaning The Threads
The first thing you need to do is clean the inside of your pipe so you can take a look at it and decide where you need the repair to go. For half-inch pipe thread you need to use a pipe tap. This kind of pipe tap has tapered threads because it is for a pipe thread. The tap has to be a half-inch too.
Cleaning thread is also called chasing the threads. The threads already exist inside so you need to gently thread this into place and then by turning it in you have to recut the threads and just basically clean them off.
So what you have to do here is chase the thread and clean them up. You might not have the same problem but it will be a good addition to your repair though. Here you have to make sure that the tool is lubricated. So you can use motor oil for this.
This kind of tap is made of high-speed steel and is very brittle. But this thing can easily break even though they look pretty tough, with enough torque you can shatter this steel. So be very careful and precise with this tool.
Step 2: Attach Tap Wrench
Here you need to hand thread the tap into place and have to put the tap wrench on top. The tap wrench fits over the tap grips on it and allows you to get a lot of torque to turn it. However, we’ve often found that a chasing thread like this is better to start by hand.
So now start threading the tap in by hand before you put the tap wrench on top. Because by hand you have a much better chance of giving the alignment right. When you got this big unwieldy wrench over the top of it you can get messed up and not know it.
So this is imperative that you start in the proper position. Here you don’t want to cut brand new threads at an angle. Rather you want to start in the same axis of the existing threads and get that put in like that.
Step 3: Start With Your Threading
Now you are going to tread it in as far as you can by hand just to make sure you are engaging with the existing threads properly. When it’s in there as tight as you can get by handset the tap wrench on top and rotate the handle of the wrench.
Here it moves the jaw and grips the tap so now you have full control over the tab. Now turn it back up and repeat. When you can feel it getting difficult, then it will get easier. This means you must have cut through or broken through a damaged part of the thread.
So here you can notice that first, you turned about a half then a turn back up a quarter. That breaks loose the metal chip you’ve formed as you’re cutting with this tool. You’ll feel this will go nice and smooth meaning the motor oil is doing its job lubricating the tool as you cut.
Step 4: Cutting New Threads
So what you have to do here is just keep turning it in. which is going to progressively feel tighter because the wedge of that tap is going to start matching the wedge o the female threads.
Once to get past the damaged areas, it just starts getting progressively tighter. If you were to continue cutting what it would do is just make the threads deeper.
You just want to chase the existing threads, and clean them up a bit. So now it’s time to take it out when the chase is getting tighter enough. Here you could tell as you threaded it in, that there were areas where it felt momentarily difficult then it got freer and that means you were cleaning up those damaged areas.
Step 5: Attach A Pipe Fitting To Check
So at this point what you can do is just take a pipe fitting and thread it in there and see how it fits. When you’ll take the chase you’ll see the chips in the tool which you cleaned out the metal you cut. Now take a pipe fitting and set it in place and you’ll feel the joint getting much better.
You might also like
- How To Cut Copper Pipe In Tight Space
- 5 Ways How To Remove Wooden Dowels
- How To Use Scalp Massager
- How To Measure Whipped Cream
- How To Get Hard Candy Out Of The Pan at Home
Frequently Asked Questions (FAQ)
How To Fix Damaged Threads
If you’re lucky, you may be able to salvage the thread by using a thread file. If the damage is more severe, you’ll need to use a thread tap. First, determine the size of the thread and then select the appropriate tap. With the tap in hand, insert it into the hole and turn it clockwise until it’s tight.
Next, use the tap handle to turn the tap counterclockwise. This will create new threads in the hole. Finally, remove the tap and test the new threads with a bolt.
How To Repair Damaged Plastic Pipe Threads
If you have a plastic pipe that has damaged threads, there are a few things you can do to repair it. First, try using a thread repair kit. These kits come with a variety of tools and materials that you can use to repair the threads.
If the damage is not too severe, you may be able to use a tap and die set to repair the threads. If the damage is more severe, you may need to replace the entire section of the pipe.
Can You Rethread A Pipe?
If you have a pipe that is starting to leak, you may be able to stop the leak by re-threading the pipe. This is a relatively easy process, but it does require some patience and careful work. Here is a step-by-step guide to re-threading a pipe:
- Start by shutting off the water to the pipe that you will be working on. This will prevent any water from coming out while you are working.
- Use a pipe wrench to loosen the connection at the leaking point. You may need to use some force, but be careful not to damage the pipe.
- Once the connection is loose, remove the leaking pipe from the fitting.
- Inspect the end of the pipe to see if the threads are damaged. If they are, you will need to cut off the damaged threads with a pipe cutter.
- Once the damaged threads are removed, use a pipe tap to create new threads on the end of the pipe.
- Screw the pipe back into the fitting, using the new threads. Tighten the connection with the pipe wrench.
- Turn the water back on and check for leaks. If there are none, you have successfully repaired the leak.
Can You Restore Threads?
Have you ever had a situation where you accidentally deleted an important thread on your computer? Or maybe you were the victim of a malicious attack and all of your threads were deleted. If you have, you may be wondering if there is any way to restore them.
The answer is yes, in most cases it is possible to restore threads. However, it is important to note that the success of the restoration will depend on several factors, such as the type of thread that was deleted and how it was deleted.
If the thread was simply deleted from your computer, there is a good chance that it can be recovered. This is because when a file is deleted, it is not actually removed from the storage device immediately. Instead, the space that the file occupied is simply marked as being available for use. As long as you have not saved any new data to the device, it is possible to use data recovery software to restore the deleted thread.
However, if the thread was deleted using a secure deletion method, such as shredding or wiping, it will be much more difficult to recover. This is because these methods write over the space that the file occupied with random data, making it impossible to recover the original data.
If you have accidentally deleted an important thread, the best thing to do is to stop using the computer immediately and contact a data recovery specialist. They will be able to advise you on the best course of action and, in most cases, will be able to successfully recover the deleted data.
How Do You Seal A Leaking Pipe Thread?
If you have a leaking pipe thread, there are a few things you can do to seal it. You can use a pipe thread sealant, which is a sticky substance that you apply to the threads.
This will create a seal between the threads and prevent leaks. You can also use Teflon tape, which is a thin tape that you wrap around the threads. This will also create a seal and prevent leaks.
Final Verdict
So by doing and following all these steps of how to repair damaged pipe threads that we explained earlier you can successfully and very easily repair the threads in your pipe that were previously damaged.