The Arlo Wired Video Doorbell is a sophisticated home security device that allows you to monitor and interact with visitors at your front door from anywhere using your smartphone or other compatible devices. With its high-definition video and two-way audio capabilities, the Arlo Wired Video Doorbell provides enhanced security and convenience to homeowners.
If you’re considering installing the Arlo Wired Video Doorbell in your home, you’ve come to the right place. In this guide, we will walk you through the step-by-step process of installing the Arlo Wired Video Doorbell, ensuring that you can set it up quickly and effectively.
Before we delve into the installation process, it’s essential to note that the Arlo Wired Video Doorbell requires a wired connection and a compatible doorbell system for power. Additionally, it is compatible with existing mechanical or digital door chimes, making it a versatile option for various setups.
Throughout this guide, we will cover everything from gathering the necessary tools and materials to connecting the doorbell to your home’s electrical system, setting up the Arlo app, and testing the functionality of your new video doorbell.
By following the instructions provided here, you’ll be able to install the Arlo Wired Video Doorbell efficiently and begin enjoying its features, such as motion detection, remote access, and real-time notifications whenever someone is at your door.
Please note that electrical work involves inherent risks and should be approached with caution. If you’re not comfortable working with electrical systems, it is highly recommended to consult a professional electrician to ensure a safe and proper installation.
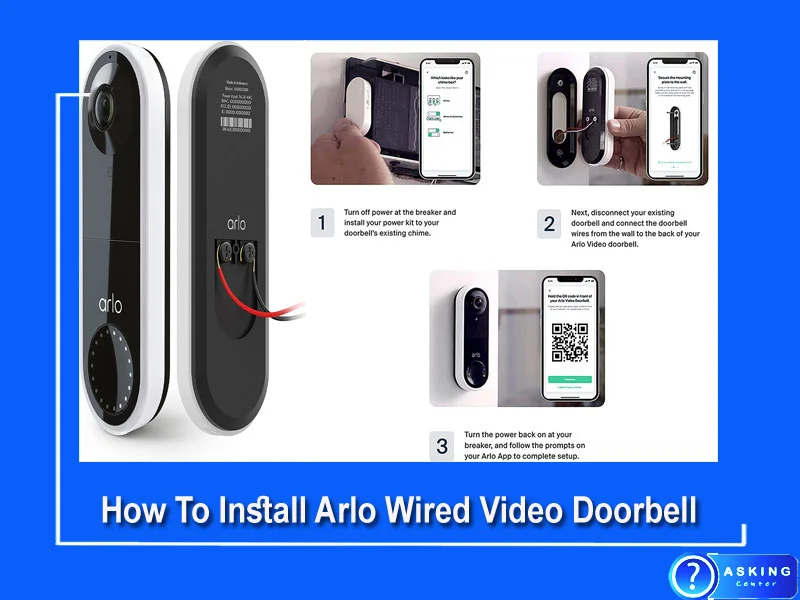
How To Install Arlo Wired Video Doorbell
Now, let’s begin the step-by-step How To Install Arlo Wired Video Doorbell and bring enhanced security and convenience to your home.
Before starting the installation process of the Arlo Wired Video Doorbell, it’s important to gather the necessary materials and tools. Here’s a list of items you’ll need to ensure a smooth installation:
- Arlo Wired Video Doorbell: Purchase the Arlo Wired Video Doorbell, which comes with the necessary components for installation.
- Screwdriver: You’ll need a screwdriver, preferably a Phillips-head screwdriver, to secure the mounting bracket and screws during the installation.
- Drill (if necessary): Depending on your door’s surface, you may need a drill to create holes for mounting the doorbell. Make sure you have the appropriate drill bits for the material you’ll be drilling into (e.g., wood, metal, or concrete).
- Level: To ensure that the Arlo Wired Video Doorbell is properly aligned, a level will help you maintain a straight and balanced installation.
- Wire strippers: If you need to connect or extend wiring during the installation process, wire strippers will be necessary to remove insulation from the wires for proper connections.
- Existing Doorbell Components: If you have an existing doorbell system, make sure to gather any components that may be required for connecting the Arlo Wired Video Doorbell, such as doorbell wires, transformer, chime, and any necessary connectors.
- Power Drill (optional): If you need to create holes for the wiring or mounting screws, a power drill will make the process quicker and easier.
- Smartphone or Tablet: You will need a smartphone or tablet to download and install the Arlo app, which is essential for setting up and configuring the Arlo Wired Video Doorbell.
- Wi-Fi Network: Ensure that you have a stable Wi-Fi network available during the installation process. The Arlo Wired Video Doorbell relies on a wireless connection to transmit video and audio to your mobile device.
- Internet Connection: Make sure your home has an active and reliable internet connection for seamless communication between the Arlo Video Doorbell, the Arlo app, and your mobile device.
By having these materials and tools ready, you’ll be fully prepared to install the Arlo Wired Video Doorbell and enjoy the benefits of enhanced home security and convenience.
Step 1: Gather the Required Materials and Tools
Before starting the installation process, gather all the necessary materials and tools mentioned in the previous response. This ensures you have everything at hand and avoids interruptions during the installation.
Step 2: Prepare for Installation
Ensure that your home’s electrical power is turned off at the breaker box before starting any electrical work. This step is crucial for your safety. Locate your existing doorbell chime and transformer, which will be used to power the Arlo Wired Video Doorbell.
Step 3: Remove the Existing Doorbell
Using a screwdriver, carefully remove the screws securing the existing doorbell to the wall. Once the doorbell is loose, gently disconnect the wiring from the back of the unit. Take note of how the wires are connected, as you’ll need this information later.
Step 4: Prepare the Mounting Bracket
Take the Arlo Wired Video Doorbell and its accompanying mounting bracket. Align the holes on the bracket with the existing holes in the wall. If there are no existing holes or you need to reposition the doorbell, use a drill and appropriate drill bit to create new holes.
Step 5: Mount the Bracket
Secure the mounting bracket to the wall using the provided screws and a screwdriver. Ensure that the bracket is level and firmly attached to the wall.
Step 6: Connect the Wiring
Using the wire strippers, carefully strip the insulation from the ends of the existing doorbell wires. If necessary, extend the wires using wire connectors. Connect the wires to the corresponding terminals on the back of the Arlo Wired Video Doorbell, following the labeled instructions.
Step 7: Attach the Doorbell
Gently slide the Arlo Wired Video Doorbell onto the mounting bracket. Ensure that it is securely in place and aligned properly. Use the provided security screws to fasten the doorbell to the bracket, using a screwdriver.
Step 8: Connect the Chime and Transformer
Locate the doorbell chime and transformer in your home. Connect the existing doorbell wires to the appropriate terminals on the chime, ensuring they match the original configuration. Connect the other end of the wires to the transformer, again matching the correct terminals. This step provides power to the Arlo Wired Video Doorbell.
Step 9: Turn on Power
Once all the wiring connections are secure, go back to your breaker box and turn the power back on. This will supply power to the doorbell and ensure it functions properly.
Step 10: Download and Set Up the Arlo App
On your smartphone or tablet, go to the app store and download the Arlo app. Open the app and create an account if you don’t already have one. Follow the on-screen instructions to set up your Arlo system.
Step 11: Add the Arlo Wired Video Doorbell
In the Arlo app, navigate to the device settings and select “Add Device.” Choose the Arlo Wired Video Doorbell from the list of available devices. Follow the prompts to connect the doorbell to your Wi-Fi network. Ensure that the doorbell is within range of your Wi-Fi signal during this process.
Step 12: Configure Doorbell Settings
Once the Arlo Wired Video Doorbell is connected, you can customize its settings in the Arlo app. Set your preferred motion detection sensitivity, adjust the motion zones, and configure any other desired options.
Step 13: Test the Doorbell
To ensure everything is working correctly, press the doorbell button and verify that you receive a notification on your mobile device. Open the Arlo app and check the live video feed from the doorbell to confirm that the video
Arlo Wired Doorbell Manual
The Arlo Wired Doorbell Manual provides comprehensive instructions on how to install and operate your Arlo doorbell. It covers all aspects of the setup process, from installing the hardware to connecting the device to your home Wi-Fi network.
Additionally, it includes troubleshooting tips for common issues and information about available features such as motion detection, night vision, two-way audio, and more.
With this manual in hand, you’ll be able to get up and running with your new doorbell quickly and easily!
Arlo Doorbell Installation Troubleshooting
If you are having trouble installing your Arlo Doorbell, there are a few steps that can help troubleshoot the issue. First, make sure the device is powered on and connected to an active Wi-Fi network with at least 2Mbps of upload speed.
Additionally, check for any obstructions or interference in the area where the doorbell is being installed as this may affect its performance.
Finally, resetting your Arlo Doorbell by pressing and holding down both buttons simultaneously for 10 seconds should resolve most installation issues.
Arlo Video Doorbell Installation Without Existing Doorbell
Installing an Arlo Video Doorbell without an existing doorbell is fairly straightforward and can be done in just a few simple steps.
First, attach the mounting plate to your doorjamb using the screws provided with your device. Next, line up the video doorbell on the mounting plate and secure it in place with the included screws.
Finally, connect your device to power either through its rechargeable battery or by hardwiring it into electrical wiring already installed near your front door and you’re ready to start monitoring from anywhere!
Arlo Doorbell Manual
The Arlo Doorbell Manual provides detailed instructions on how to set up and use your Arlo Doorbell. It covers topics such as installing the device, connecting it to your home WiFi network, configuring motion detection settings, setting up custom alerts, using two-way audio communication, and more.
This manual is essential for getting the most out of your Arlo doorbell and ensuring that you have a secure and reliable connection at all times.
Arlo Essential Wired Video Doorbell
The Arlo Essential Wired Video Doorbell is the perfect security solution for your home. With full HD video and a motion sensor, it captures clear images of visitors from up to 15 feet away even in low-light conditions.
It also features two-way audio so you can communicate with visitors directly from your smartphone or tablet.
Additionally, its weatherproof design ensures its protection against rain, snow, and other elements for years to come.
Arlo Doorbell Power Kit
The Arlo Doorbell Power Kit is a great solution for those who need to power their Arlo doorbells without having to pay extra for installation.
This kit includes everything you need to install your doorbell: two mounting screws, two wall anchors, and a 16ft power cable that connects the transformer directly to an existing outlet. With this kit, you can save time on installation and money in the long run by avoiding additional wiring costs.
Arlo Wired Video Doorbell Review
The Arlo Wired Video Doorbell is a great option for those looking to enhance their home security. It has clear video quality, and two-way audio capabilities, and will even alert you when motion is detected outside your door.
With its simple setup process and easy-to-use app, the Arlo Wired Video Doorbell provides an effective way to monitor your front door from anywhere in the world.
Plus, it’s one of the most affordable options on the market today!
How Do I Setup My Arlo Video Doorbell Wired?
• Disconnect the existing doorbell wires from their source.
• Connect one wire to the “C” terminal on the Arlo Chime and connect another wire to one of the “T” terminals.
• Line up your Arlo Video Doorbell with its mounting plate, then securely attach it with screws provided in the packaging.
• Download and install Arlo App on your mobile device.
• Follow instructions in the app to finish the setup process for your wired video doorbell.
To set up an Arlo video doorbell that is connected via wiring, you will need a few simple tools such as a screwdriver and electrical tape or wire nuts.
First, disconnect any existing doorbell wires from their power source before connecting them to either the “C” terminal at the back of your chime unit or one of two “T” terminals located near it for easy access during installation.
Next, mount your new video doorbell using provided screws until tightly secured onto its mounting plate followed by downloading and installing Arlo App on a compatible mobile device which can be used as a remote control during the setup process until completion.
How Do You Install Arlo Wired Doorbell Without Existing Chime?
Installing Arlo Wired doorbell without an existing chime can be done in a few simple steps:
• Determine the wiring type and connect it to the appropriate terminals of the doorbell.
• Connect the power supply from an AC transformer that is compatible with your device.
• Secure all connections with wire nuts or electrical tape.
• Install mounting bracket on the wall, then fit doorbell into place, attaching screws if necessary. Once all connections are secure, you’re ready to set up your Arlo Wired Doorbell and start using it!
Does the Arlo Wired Video Doorbell Require a Base Station?
Yes, the Arlo wired video doorbell requires a base station. Specifically,
• The base station is an Arlo SmartHub or compatible with HomeKit Secure Video (HSV) such as Apple TV.
• It must be connected to your router and powered on to support the doorbell.
The base station enables you to access your surveillance footage from anywhere in the world via cloud storage and provides live streaming of events at your doorstep on a smartphone app.
What are the Requirements for Arlo Wired Doorbell?
The Arlo Wired Doorbell requires power, a compatible chime, and the Arlo app.
Requirements include:
– 10-36 VAC doorbell transformer with 16VAC 30VA rating
– Compatible mechanical or digital chime (not included)
– Wireless router for setup and operation of the device
It is important to note that only the wired version of Arlo’s video doorbell works with a traditional doorbell chime.
Conclusion
The Arlo Wired Video Doorbell is a great way to increase the security of your home. It can be easily installed with the help of a few simple tools and steps. With its advanced features, you will have peace of mind knowing that your home is safe from intruders.
Thanks to this blog post, you now have all the information necessary for a successful installation process!
Frequently Asked Questions (FAQs)
How To Install Arlo wired doorbell without existing doorbell?
Determine Power Source: Identify a nearby power source for the doorbell. It can be an existing electrical outlet or junction box.
Install Power Source: If using an electrical outlet, plug in a power adapter that converts the outlet to low voltage (usually 16-24 volts). If using a junction box, consult a professional electrician to install a transformer.
Mount the Doorbell: Follow Steps 4 to 9 mentioned in the previous guide to mount the Arlo Wired Video Doorbell using the provided bracket.
Connect Wiring: Run low-voltage wiring from the power source to the back of the doorbell, following local electrical codes. Strip the insulation from the ends of the wires and connect them to the appropriate terminals on the doorbell, as per the labeled instructions.
Turn on Power: Once the wiring connections are secure, turn on the power at the breaker box or by plugging in the power adapter. This will provide power to the doorbell.
Set Up Arlo App: Download the Arlo app on your smartphone or tablet, create an account, and follow Steps 10 to 13 in the previous guide to add and configure the Arlo Wired Video Doorbell.
By following these steps, you can install the Arlo Wired Video Doorbell even if you don’t have an existing doorbell system in place.
How do you install a wired doorbell video?
Gather Materials: Collect all the required materials and tools mentioned in the previous guide.
Remove Existing Doorbell (if applicable): If you have an existing doorbell, carefully remove it from the wall by unscrewing the mounting screws and disconnecting the wiring.
Prepare Mounting Bracket: Take the provided mounting bracket and align it with the existing holes or use a drill to create new holes if needed.
Mount the Bracket: Secure the mounting bracket to the wall using screws and a screwdriver. Ensure it is level and firmly attached.
Connect Wiring: Strip the insulation from the ends of the existing doorbell wires and connect them to the corresponding terminals on the back of the video doorbell, following the labeled instructions.
Attach the Doorbell: Slide the video doorbell onto the mounting bracket and secure it using the provided security screws.
Connect Chime and Transformer: Connect the existing doorbell wires to the appropriate terminals on the chime and then to the transformer to supply power to the doorbell.
Turn on Power: Restore power at the breaker box or plug in the power adapter to activate the doorbell.
Set Up the App: Download and install the Arlo app on your mobile device. Create an account and follow the on-screen instructions to add and configure the video doorbell.
By following these steps, you can successfully install a wired doorbell video, providing you with enhanced security and convenience at your front door.
How do I connect my Arlo wired camera?
Power the Camera: Ensure that the camera is connected to a power source, either through an electrical outlet or a wired power supply.
Download Arlo App: On your smartphone or tablet, download and install the Arlo app from the app store.
Create an Account: Launch the Arlo app and create an account if you don