Installing a laundry tub drain pipe is not a difficult task, but there are a few things that need to be considered before beginning the installation. The most important thing to consider is the size of the drain pipe. The laundry tub drain pipe should be the same size as the drain pipe for the washer.
If the drain pipe is too small, it will not be able to handle the amount of water that is produced by the washer. The next thing to consider is the type of material that the laundry tub drain pipe is made from. The most common type of material is PVC, but there are also metal and rubber options.
The type of material that you choose will be based on the type of washer that you have. If you have a front-loading washer, you will need to use a different type of pipe than if you have a top-loading washer. The last thing to consider is the length of the drain pipe.
The drain pipe needs to be long enough to reach from the laundry tub to the washer. If the pipe is too short, it will not be able to properly drain the water from the laundry tub.
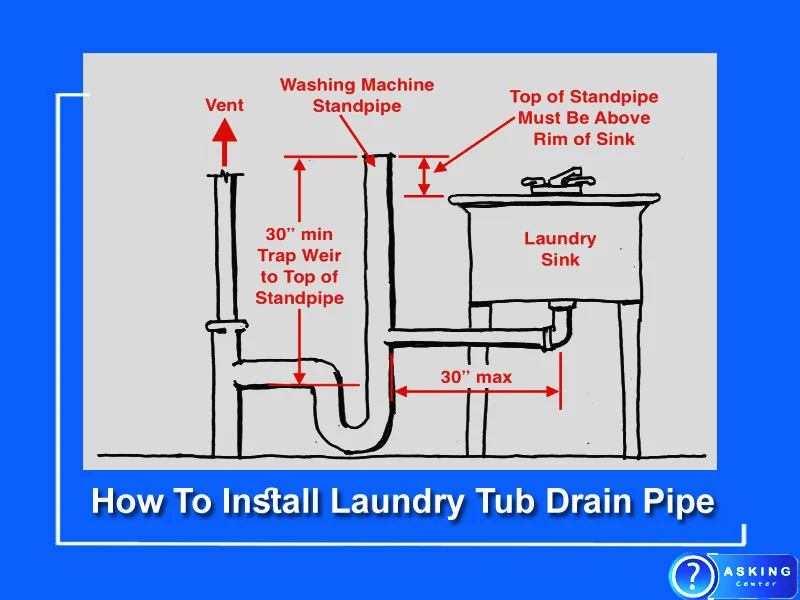
How To Install Laundry Tub Drain Pipe |8 Simple Steps
It is a reasonably easy procedure that just requires a few simple pieces of equipment and some fundamental plumbing knowledge to install a laundry tub drain pipe. For the water in the laundry tub to be properly drained, a drain pipe is required. Water will not properly drain without a good drain pipe, which could harm the flooring as well as the plumbing fixtures. A step-by-step guides for How To Install Laundry Tub Drain Pipe is provided here.
Step 1: Gather Tools And Materials
Make sure you have all the required tools and materials on hand before you start. What you’ll need is as follows:
- Laundry tub drain kit
- PVC primer and cement
- Hacksaw
- Measuring tape
- Pliers
- Screwdriver
- Adjustable wrench
- Pipe cutter
Step 2: Remove The Old Drain Pipe
Start by removing the old pipe if you’re replacing an old laundry tub drain. It’s a good idea to have a backup plan in case the backup plan fails. You should be able to remove the pipe from the wall or floor drain once the nuts have been removed.
Step 3: Measure The New Drain Pipe
Make sure the new drain pipe is the right length by measuring it. If it is too lengthy, cut it with a pipe cutter to the proper length. You’ll need to acquire a longer pipe if it’s too short.
Step 4: Assemble the Drain Kit
Assemble the laundry tub drain kit according to the manufacturer’s instructions. This will typically involve attaching the drain pipe to the drain basket and securing it with nuts.
Step 5: Attach The Drain Pipe To The Laundry Tub
Using the nuts included in the kit, join the drain pipe to the drain basket by slipping it through the washtub’s opening. Ensure that the basket’s drain pipe is well fastened.
Step 6: Attach The Drain Pipe To The Wall Or Floor Drain
The other end of the drain pipe should be slid into the wall or floor drain and fastened with the nuts included in the package. A secure connection between the drain pipe and the drain should be made.
Step 7: Test The Drain
To test the drain and see if it is functioning properly, turn on the water. Make sure the water is draining fast and completely and check for leaks.
Step 8: Seal The Joints
Use PVC primer and cement to seal the connections between the drain pipe and the washing tub and the wall or floor drain once you are confident that it is functioning properly. Apply the cement to the same spots after applying the primer to the pipe’s outside and the fitting’s interior. To enable the cement to set, push the two pieces together and keep them in position for a brief period of time.
In conclusion, setting up a laundry tub drain pipe is a reasonably simple process that can be carried out with a few simple tools and a basic understanding of plumbing. You can make sure that your laundry tub drains correctly and stop damage to your flooring and plumbing fittings by following these instructions.
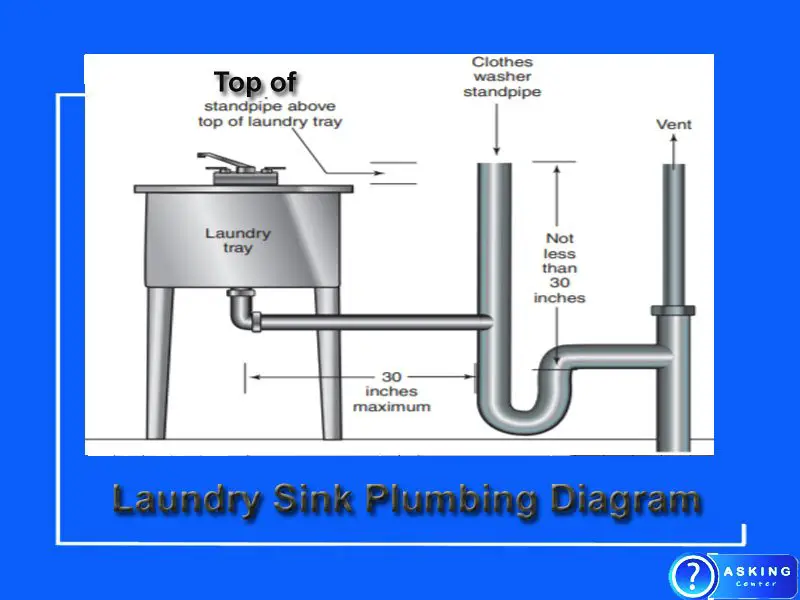
Laundry Sink Plumbing Diagram
If you’re planning on tackling a laundry sink plumbing project, it’s important to have a clear understanding of the piping involved. After all, a proper plumbing job is all about making the right connections. To help you out, we’ve put together a detailed laundry sink plumbing diagram.
This guide covers everything from the drain and supply lines to the P-trap and vent stack. So take a look and get started on your next project with confidence!
How To Install Utility Sink In Laundry Room
Installing a utility sink in your laundry room can be a great way to have a dedicated space for cleaning up messy tasks. While you can always use your regular sink for this purpose, having a separate sink can make things much more convenient. Utility sinks are usually larger and have a sturdier build than regular sinks, making them ideal for handling heavy-duty tasks.
Plus, they often come with features like built-in cabinets and shelves, which can provide additional storage space in your laundry room. If you’re considering installing a utility sink in your laundry room,
Here’s what you need to know:
1. Decide on the location. Utility sinks are typically installed in a corner of the laundry room. This makes it easy to access and leaves plenty of space for other laundry room essentials.
2. Choose the right size. Utility sinks come in a variety of sizes. It’s important to choose one that will fit well in the space you have available.
3. Prepare the area. Once you’ve selected the location for your utility sink, you’ll need to prepare the area. This usually involves removing any existing cabinets or shelving, as well as any drywall or other obstacles.
4. Install the sink. The next step is to install the sink. This will require some basic plumbing knowledge, so it’s a good idea to hire a professional if you’re not comfortable doing it yourself.
5. Connect the plumbing.
Double Utility Sink Drain Parts
Utility sinks are an essential part of any home laundry room or mudroom. They provide a place to wash your hands, soak laundry, and rinse off muddy boots and clothes. But what do you do when your utility sink drain starts to leak or clog?
Luckily, most double utility sink drain parts are fairly easy to find and replace. Here is a quick guide to help you get your utility sink back in working order in no time. First, take a look at the drain assembly to see if there are any cracked or broken parts.
If you see any damage, you will need to replace the entire drain assembly. If the drain assembly looks in good condition, the next step is to clean out any debris that may be clogging the drain. You can use a plunger or a plumber’s snake to clear the blockage.
Once the drain is clear, you can reattach the drain assembly. Make sure all the parts are tightened securely. Then, turn on the water and check for leaks.
If your utility sink is still leaking, you may need to replace the P-trap. The P-trap is the curved pipe that connects the drain assembly to the sewer line. You can find replacement P-traps at most hardware stores.
Just be sure to get the right size to fit your utility sink.
Cost To Install Utility Sink In Basement
Adding a utility sink to your basement can be a great way to increase the functionality of the space. Utility sinks are perfect for tasks like laundry, cleaning, and general upkeep. When deciding to install a utility sink, there are a few factors to consider including cost, materials, and installation.
The cost to install a utility sink in your basement will vary depending on the size and type of sink you choose. A small, basic utility sink can start around $50, while a larger, more elaborate sink can cost upwards of $200. The cost of installation will also vary depending on the complexity of the job.
If you are simply adding a utility sink to an existing plumbing line, the installation cost will be relatively low. However, if you need to run new plumbing lines to accommodate the sink, the cost will be higher. Utility sinks are typically made from materials like ceramic, porcelain, or stainless steel.
Each material has its own benefits and drawbacks, so be sure to choose the one that best suits your needs. Ceramic and porcelain sinks are typically less expensive, but they are also more susceptible to chipping and breaking. Stainless steel sinks are more durable, but they are also more expensive.
When it comes to installation, you have a few options. You can choose to do it yourself, hire a professional, or have the sink installed by the store where you purchased it.
How To Install Utility Sink In Garage
Installing a utility sink in your garage is a great way to have a convenient place to wash your hands, clean up after working on projects, and more.
Here are the steps to take to install a utility sink in your garage:
1. Choose the location for your utility sink. It should be close to a water source and have enough space around it for you to move freely.
2. Mark the outline of the sink on the wall with a pencil.
3. Cut out the opening for the sink using a saw.
4. Install the sink basin into the opening.
5. Attach the faucet to the sink.
6. Connect the water supply line to the faucet.
7. Turn on the water and test the sink.
8. If everything is working properly, caulk around the edges of the sink to create a water-tight seal. Now you have a functional utility sink in your garage!
Installing A Utility Sink To Existing Plumbing
Installing a utility sink to existing plumbing is not as difficult as it may seem. With a few tools and the proper know-how, you can easily add a utility sink to your home. The first step is to determine where you would like the utility sink to be located.
Once you have determined the location, you will need to measure the space and mark the wall for the cut-out. Next, use a Sawzall or similar tool to cut out the space for the utility sink. Now it is time to install the sink.
Most utility sinks come with all of the necessary hardware, but you may need to purchase additional plumbing supplies depending on your specific installation. Once you have all of the necessary supplies, follow the instructions that came with the utility sink to install it. That’s it!
With a few simple steps, you can easily add a utility sink to your home.
How Do You Plumb A Laundry Tub?
There are a few things you need to do in order to plumb a laundry tub. First, you need to find the right location for the tub. It should be close to the water supply and the drain.
Then, you need to measure the space and cut the necessary holes. After that, you need to install the tub and connect it to the water supply and drain. Finally, you need to test the tub to make sure it is working properly.
How Do I Connect My Laundry Sink Drain?
Assuming you would like tips on how to connect a laundry sink drain:
1. If you are working with a new sink, start by attaching the P-trap to the drain stub-out. The P-trap is that curved portion of pipe under your sink; its purpose is to hold water and prevent sewer gases from coming back up through the drain.
2. Once the P-trap is in place, you can attach the drain lines to the P-trap. If you’re working with PVC pipe, you’ll need to use PVC cement; if you’re working with copper pipe, you’ll need to solder the connections.
3. Next, you’ll need to connect the drain lines to the washer standpipe. Again, if you’re working with PVC pipe, you’ll need to use PVC cement; if you’re working with copper pipe, you’ll need to solder the connections.
4. Finally, you’ll need to connect the overflow pipe to the washer standpipe. The overflow pipe is a small pipe that goes from the washer standpipe up to the overflow valve; its purpose is to allow water to escape if the washer overflows.
You’ll need to use PVC cement or solder to make this connection.
Can A Laundry Sink Drain Be Installed Without A Trap Under It?
It’s a common misconception that laundry sink drains need a trap under them, but this is not the case! A laundry sink drain can be installed without a trap, as long as the drainpipe is connected to a drain line that has a trap. This means that the laundry sink drain will not be connected directly to the sewer line, but will instead be connected to a drain line that has a trap.
This is perfectly fine and will not cause any problems.
How Do I Install Utilatub?
Assuming you would like a step-by-step guide on how to install a Utilatub:
1. First, cut a hole in the wall where you would like the Utilatub to be installed. The hole should be big enough to accommodate the tub, but not too big that it will be difficult to fill with wallboard later.
2. Next, install the metal bracket that will support the Utilatub. The bracket should be screwed into place using large washer head screws.
3. Now it’s time to install the Utilatub itself. Simply place the tub into the hole and screw it into the bracket.
4. Finally, finish the installation by covering the hole with the wallboard. Tape and mud the seams as you would with any other wall repair.
Then paint or texture the wall to match the rest of the room.
Conclusion
If you’re looking to install a laundry tub drain pipe, there are a few things you’ll need to keep in mind. First, you’ll need to measure the distance from the center of the drain to the edge of the laundry tub. Next, you’ll need to cut a piece of pipe that’s slightly longer than the distance you measured.
Once you have your pipe, you’ll need to attach it to the drain using a rubber gasket and a coupling nut. Finally, you’ll need to attach the other end of the pipe to a P-trap. Once everything is installed, you should be all set!