Installing a toilet paper holder is a simple and straightforward task that can be completed by anyone with basic DIY skills. A toilet paper holder is an essential bathroom accessory that not only provides a convenient place to store and dispense toilet paper but also adds a decorative element to the room. Whether you’re renovating your bathroom or simply need to replace an old or broken holder, this guide will provide you with step-by-step instructions on how to install a toilet paper holder. With the right tools and some basic knowledge, you can have a new toilet paper holder installed in no time!
How To Install Toilet Paper Holder | 7 Easy Steps
How To Install Toilet Paper Holder is a simple and straightforward process that can be completed with basic tools and a few easy steps. Here’s a step-by-step guide on how to install a toilet paper holder:
Step 1: Gather the necessary tools and materials
Tools and materials:
Toilet paper holder
Screws
Screwdriver
Pencil
Measuring tape
Step 2: Choose the location
Choose a location for your toilet paper holder that is within easy reach of the toilet but also not too close to the toilet to avoid interference when you sit. A height of 26 inches above the floor is recommended.
Step 3: Mark the location
Use a pencil to mark the location of the toilet paper holder on the wall. Hold the holder up to the wall at the desired height and make a small mark on the wall where the screws will be installed.
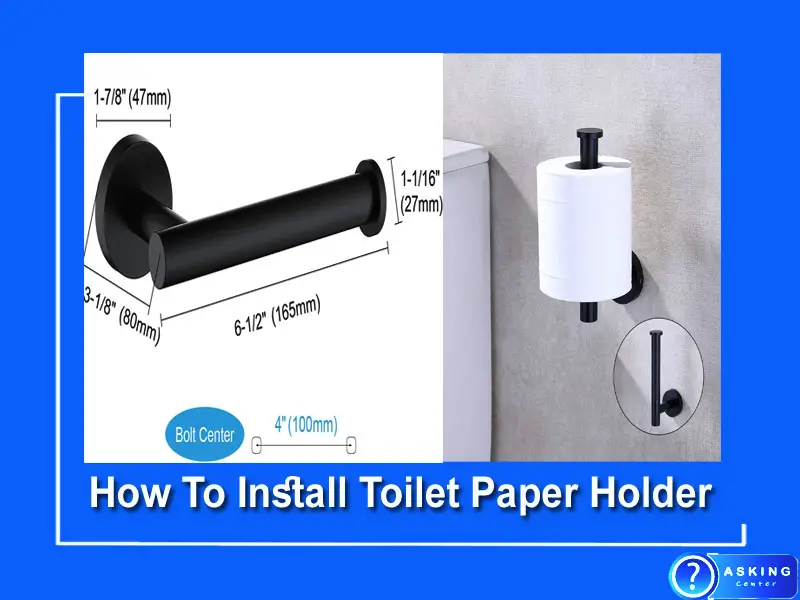
Step 4: Measure and mark the distance between screw holes
Measure the distance between the screw holes on the back of the toilet paper holder. Then, use the measuring tape to measure the same distance on the wall from the center of your first mark. Mark the spots where the screws will go.
Step 5: Install the screws
Use a drill to make pilot holes at the spots you marked for the screws. Insert the screws through the holes in the back of the toilet paper holder and then screw them into the pilot holes in the wall. Tighten the screws until the holder is secure.
Step 6: Attach the toilet paper holder
Once the screws are securely in place, slide the toilet paper holder onto the screws until it snaps into place.
Step 7: Test the holder
Give the holder a little tug to make sure it’s secure. If it feels loose, tighten the screws a bit more.
Congratulations! You have successfully installed your toilet paper holder. Enjoy the convenience of having your toilet paper within easy reach.
How To Install Toilet Paper Holder On Tile Wall
Installing a toilet paper holder on a tile wall can be a bit more challenging than on drywall. However, with the right tools and techniques, it is still a relatively simple DIY project that can be completed in a short amount of time. In this article, we will provide step-by-step instructions on how to install a toilet paper holder on a tile wall.
Step 1: Gather the Necessary Tools and Materials
Before you begin the installation process, gather the necessary tools and materials. You will need a drill, a tile bit, screws, anchors, a pencil, a level, and a toilet paper holder.
Step 2: Choose the Location
Choose the location where you want to install the toilet paper holder on the tile wall. Use a pencil to mark the spot on the tile where you want to place the holder. Be sure to use a level to ensure that the mark is straight.
Step 3: Drill Holes in the Tile
Using a drill bit that is specifically designed for drilling through tile, drill a hole into the marked spot on the tile. Start by placing a piece of tape over the area where you will drill to prevent the drill bit from slipping. Then, use a low speed on the drill to avoid cracking the tile. Continue to drill until the hole is deep enough to accommodate the anchor.
Step 4: Install the Anchors
Once you have drilled the hole in the tile, it is time to install the anchor. Insert the anchor into the hole, using a hammer if necessary to ensure that it is flush with the tile. Repeat this step for the other hole.
Step 5: Mount the Holder
Next, place the toilet paper holder onto the wall and align it with the anchors. Use a level to ensure that it is straight. Once you have the holder in the correct position, use a drill to screw the holder into the anchors. Be sure to tighten the screws securely, but not too tightly as it may cause damage to the tile.
Step 6: Test the Holder
Finally, give the holder a gentle tug to ensure that it is securely mounted. If it feels loose, tighten the screws further. Once you are satisfied that the holder is properly secured to the tile wall, it is ready to be used.
In conclusion, installing a toilet paper holder on a tile wall requires a bit more care and attention than on a drywall. By following the steps outlined in this article, you can have a new toilet paper holder mounted on your tile wall in no time at all.
How Do You Install A Single Arm Toilet Paper Holder?
Installing a single arm toilet paper holder is a simple DIY task that can be completed in just a few minutes. This type of holder is designed to hold one roll of toilet paper and is a popular choice for bathrooms that have limited space. In this article, we will discuss the steps involved in installing a single-arm toilet paper holder.
Step 1: Gather the Necessary Tools and Materials
Before you begin the installation process, you will need to gather a few tools and materials. You will need a drill, screws, anchors, a pencil, a level, and the single-arm toilet paper holder.
Step 2: Choose the Location
Choose the location where you want to install the toilet paper holder. The ideal height for a toilet paper holder is around 26 inches from the floor, but you can adjust this according to your preference. Use a pencil to mark the spot on the wall where you want to place the holder.
Step 3: Install the Anchors
Once you have marked the location, it is time to install the anchors. Using a drill bit that is slightly smaller than the size of the anchor, drill a hole into the wall where you marked the spot. Insert the anchor into the hole and tap it lightly with a hammer until it is flush with the wall.
Step 4: Mount the Holder
Next, place the toilet paper holder on the wall and align it with the anchors. Use a level to ensure that it is straight. Once you have the holder in the correct position, use a drill to screw the holder into the anchors. Be sure to tighten the screws securely, but not too tightly as it may cause damage to the wall.
Step 5: Test the Holder
Finally, give the holder a gentle tug to ensure that it is securely mounted. If it feels loose, tighten the screws further. Once you are satisfied that the holder is properly secured to the wall, it is ready to be used.
In conclusion, installing a single-arm toilet paper holder is a simple process that can be completed with just a few basic tools. By following the steps outlined in this article, you can have a new toilet paper holder in your bathroom in no time at all.