Installing a Ring Spotlight Cam is a simple and straightforward process that can be completed with just a few tools and some basic DIY skills. This advanced security camera is designed to provide round-the-clock surveillance of your home or business, with built-in motion sensors, night vision capabilities, and two-way audio communication.
In this guide, we will provide you with step-by-step instructions on How To Install Ring Spotlight Cam, so you can enjoy the peace of mind that comes with having a high-quality security camera watching over your property.
Before starting the installation process of a Ring Spotlight Cam, you will need a few materials and tools. Here is a list of the required items:
- Ring Spotlight Cam (with mounting bracket and screws)
- Screwdriver (Phillips’s head)
- Power drill (with drill bit)
- Pencil or marker
- Level
- Wi-Fi network and password (for connecting the camera to your network)
- Smartphone or tablet (with the Ring app installed)
It is essential to ensure that you have all the necessary materials before starting the installation process to avoid any delays or complications during the installation process.
How To Install Ring Spotlight Cam | 8 Easy Steps
Installing a Ring Spotlight Cam is a great way to enhance your home security and keep an eye on your property. This advanced security camera features motion sensors, night vision, and two-way talk capabilities, making it a versatile and effective surveillance tool. Installing the camera is a straightforward process that can be completed with just a few tools and some basic DIY skills.
In this guide, we will provide you with step-by-step instructions on How To Install Ring Spotlight Cam, from choosing the right location to connecting to Wi-Fi and customizing your settings. Whether you’re a seasoned DIYer or a novice, you’ll find these instructions easy to follow and understand. With a Ring Spotlight Cam installed
you can enjoy the peace of mind that comes with having a high-quality security camera watching over your property.
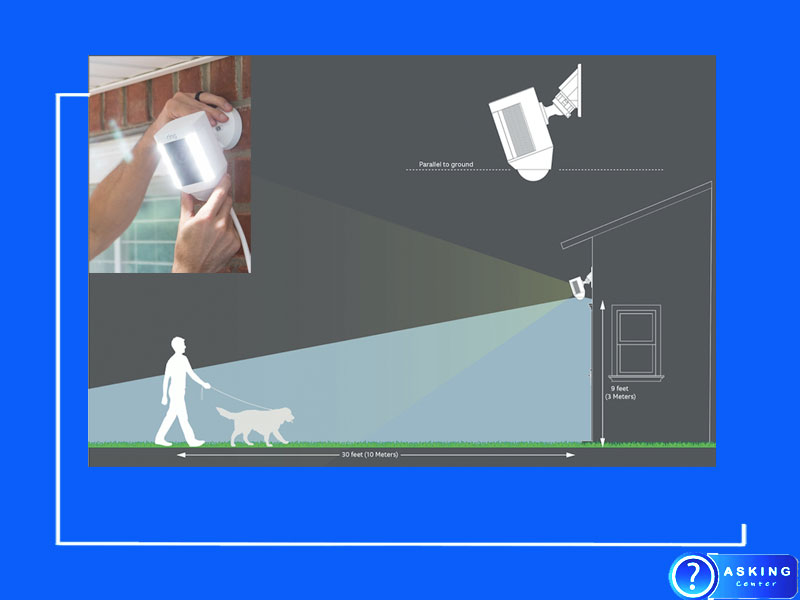
Step 1: Choose the Right Location
The first step in installing a Ring Spotlight Cam is to choose the right location. You want to select a spot where the camera can capture a clear view of the area you want to monitor. The location should also be within range of your Wi-Fi network to ensure a stable connection. Use a pencil or marker to mark the spot where you plan to install the camera.
Step 2: Install the Mounting Bracket
Next, you will need to install the mounting bracket that comes with your Ring Spotlight Cam. Use a power drill to create a small hole in the spot you marked earlier. Insert the screw that comes with the mounting bracket into the hole and tighten it with a Phillips head screwdriver.
Step 3: Connect the Wires
The Ring Spotlight Cam comes with a wire harness that you will need to connect to a power source. You can either connect the wire to an existing outdoor electrical box or plug it into a nearby electrical outlet using the included adapter. If you’re connecting to an electrical box, make sure to turn off the power before making any connections.
Step 4: Attach the Camera to the Bracket
Once the mounting bracket and wire harness are in place, it’s time to attach the camera to the bracket. First, adjust the angle of the camera by loosening the adjustment screws on the mounting bracket. Use a level to make sure the camera is straight, and then tighten the adjustment screws to hold the camera in place.
Step 5: Connect to Wi-Fi
The Ring Spotlight Cam is a wireless device that requires a Wi-Fi connection to function properly. To connect the camera to your Wi-Fi network, download the Ring app on your smartphone or tablet and follow the on-screen instructions to set up your account. Then, select the “Set up device” option and follow the prompts to connect the camera to your network.
Step 6: Customize Your Settings
Once your camera is connected to Wi-Fi, you can customize your settings through the Ring app. You can adjust the motion sensitivity, set up motion zones, and configure alerts to notify you when motion is detected. You can also enable two-way talk and night vision and set up a schedule for when you want your camera to be active.
Step 7: Test Your Camera
Before finishing the installation process, it’s a good idea to test your camera to make sure it’s working properly. Use the Ring app to access the live view feature and check that you can see a clear image of the area you want to monitor. Test the motion sensors by walking in front of the camera to make sure you receive alerts when motion is detected.
Step 8: Mount and Secure the Camera
Once you’ve confirmed that your camera is working correctly, you can mount and secure it in place. Use the included screws to attach the camera to the mounting bracket, and then make any final adjustments to the angle of the camera. You can also use the provided security screws to prevent the camera from being tampered with or stolen.
In conclusion, installing a Ring Spotlight Cam is a simple and straightforward process that can be completed with just a few tools and some basic DIY skills. By following these step-by-step instructions, you can install a high-quality security camera that will provide round-the-clock surveillance of your home or business. With customizable settings, two-way talk, and night vision capabilities, a Ring Spotlight Cam is an excellent choice for anyone looking to enhance their home security.