Installing a solar electric fence is a great way to protect your property and livestock from intruders or predators. It’s also an environmentally friendly and cost-effective solution for those living off the grid or in remote areas without access to traditional electricity sources.
However, installing a solar electric fence can seem intimidating at first, especially if you don’t have any prior experience with electrical work. In this guide, we’ll provide step-by-step instructions on How To Install Solar Electric Fence, including tips and best practices to ensure that your fence is effective, safe, and durable. Whether you’re a homesteader, rancher, or farmer, this guide will give you the knowledge and confidence you need to install your own solar electric fence and keep your property and livestock safe.
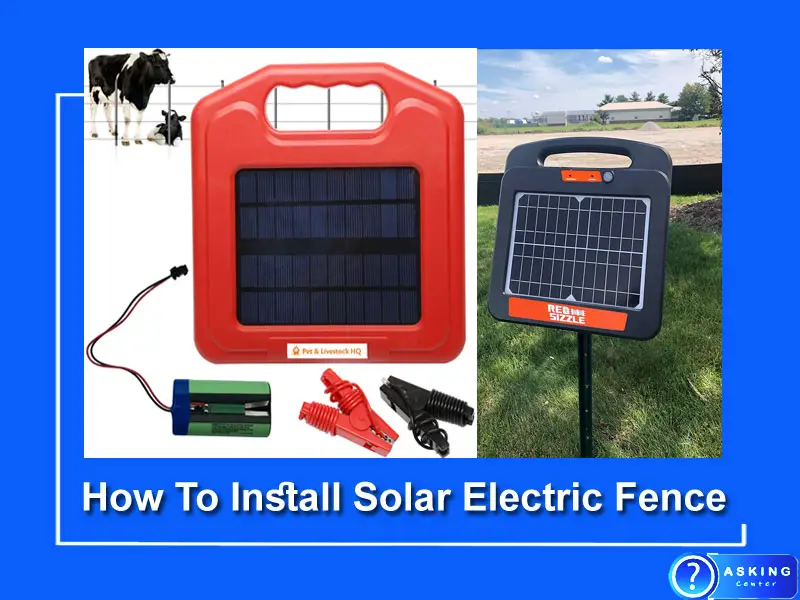
How To Install Solar Electric Fence
Installing a solar electric fence can seem intimidating at first, but with the right materials and instructions, it can be a straightforward process. Here is a step-by-step guide on How To Install Solar Electric Fence:
Before you start installing your solar electric fence, it’s important to ensure that you have all the necessary materials on hand.
Here are the materials you’ll need:
- Solar panel: The solar panel is the component that converts sunlight into electricity, which powers your electric fence. Make sure to choose a solar panel that is compatible with your fence charger.
- Fence charger: The fence charger, also known as an energizer, is the device that delivers the electrical charge to the fence. Choose a fence charger that is appropriate for the length of your fence and the type of animals you are containing.
- Battery: The battery stores the solar energy collected by the solar panel and provides power to the fence charger. Choose a deep-cycle battery that is compatible with your solar panel and fence charger.
- Fence posts: Fence posts are used to support and anchor the fence wire. Choose sturdy posts that are appropriate for the terrain and weather conditions in your area.
- Insulators: Insulators are used to secure the fence wire to the fence posts and prevent the electrical charge from being grounded. Choose insulators that are appropriate for the type of fence wire you are using.
- Fence wire: The fence wire carries the electrical charge and forms the physical barrier of the fence. Choose a wire that is appropriate for the type of animals you are containing and the terrain in your area.
- Grounding rods: Grounding rods are used to ground the electrical charge and prevent electrical interference. Choose grounding rods that are appropriate for the length of your fence and the soil conditions in your area.
- Wire connectors: Wire connectors are used to connect the fence wire to the fence charger, battery, and grounding rods. Choose connectors that are appropriate for the type of wire you are using.
- Tools: You will need a variety of tools to install your solar electric fence, including pliers, wire cutters, a voltage meter, and a post driver. Make sure to have all the necessary tools on hand before you start the installation process.
Step 1: Choose the location and layout of your fence
Before you start installing your solar electric fence, you need to choose the location and layout of your fence. Start by walking the perimeter of your property and identifying any areas that need to be fenced off. Once you have identified the boundaries of your fence, you can determine the number and placement of fence posts and the length and type of fence wire you will need.
Step 2: Install the fence posts
Once you have identified the location and layout of your fence, you can start installing the fence posts. Use a post driver to install the fence posts at regular intervals along the perimeter of your fence. Make sure that the posts are firmly anchored in the ground and are level.
Step 3: Install the insulators
Once the fence posts are in place, you can install the insulators. The insulators are used to secure the fence wire to the fence posts and prevent the electrical charge from being grounded. Screw or nail the insulators onto the fence posts at regular intervals, ensuring that they are spaced evenly and at the same height.
Step 4: Attach the fence wire
With the insulators in place, you can now attach the fence wire to the fence posts. Start by attaching the fence wire to the fence charger, making sure that the wire is securely connected to the positive and negative terminals. Run the wire along the length of the fence, attaching it to the insulators as you go. Use wire connectors to connect the fence wire to the grounding rods, making sure that the connection is secure.
Step 5: Install the solar panel and battery
With the fence wire in place, you can now install the solar panel and battery. Start by mounting the solar panel in a location that receives direct sunlight throughout the day. Connect the solar panel to the battery using the appropriate connectors, making sure that the connection is secure. Position the battery near the fence charger, ensuring that it is easily accessible for maintenance and monitoring.
Step 6: Connect the fence charger
With the solar panel and battery in place, you can now connect the fence charger. Connect the fence charger to the battery using the appropriate connectors, making sure that the connection is secure. Turn on the fence charger and use a voltage meter to test the electrical charge along the length of the fence. Adjust the settings on the fence charger as needed to ensure that the electrical charge is strong enough to deter animals from coming into contact with the fence.
Step 7: Test the fence
With the fence charger connected, you can now test the fence to ensure that it is working properly. Use a voltage meter to test the electrical charge along the length of the fence, making sure that the charge is consistent and strong enough to deter animals. Walk along the perimeter of the fence, making sure that there are no gaps or areas where the fence wire is loose or damaged.
Step 8: Maintain and monitor the fence
Once the fence is installed and working properly, it’s important to maintain and monitor the fence regularly. Check the voltage of the fence regularly using a voltage meter, and adjust the settings on the fence charger as needed to ensure that the electrical charge remains strong enough to deter animals. Inspect the fence wire and insulators regularly for damage or wear, and replace any damaged components as needed. Finally, make sure to keep the solar panel and battery clean and free from debris to ensure that they continue to function properly.
In conclusion, installing a solar electric fence requires careful planning and attention to detail, but with the right materials and instructions, it can be a straightforward process. By following these
How To Build A Solar-Powered Electric Fence
Building a solar-powered electric fence is an excellent way to keep livestock and other animals secure. This type of fencing requires a lower amount of energy than traditional battery-powered fences and can be installed quickly and easily with minimal maintenance costs.
To build your own solar-powered electric fence, you will need two main components: the charger unit and the energizer wire.
The charger unit consists of a panel array that collects sunlight throughout the day, converting it into electrical energy which is then stored in batteries for later use. The energizer wire transmits this electricity across its length, creating an electric barrier between two points on either side of it.
Solar-Powered Electric Fence For Cattle
Solar-powered electric fences are becoming increasingly popular for farmers to use when confining their cattle. These solar-powered systems provide a low-cost, efficient way of containing and protecting livestock while allowing them access to pasture and other food sources.
Solar-powered electric fences have the advantage of being easy to install, requiring minimal maintenance, and can be used in remote areas with no access to electricity.
They also offer a humane option since they only deliver an unpleasant shock that is designed not to injure animals but rather to keep them away from certain areas or boundaries.
Solar Powered Electric Fence For Horses
Solar-powered electric fence is an excellent choice for horse owners, as it provides a safe and effective way to contain horses without the need for extensive labor or high energy costs.
This type of fencing utilizes solar panels to convert sunlight into electricity which then powers the energizer that sends a mild shock through the wire when touched by your horse.
The result is a secure boundary with minimal maintenance, allowing you to spend more time enjoying your animals instead of worrying about them getting out.
How To Install Electric Fence
Installing an electric fence is a relatively straightforward process, but it’s important to ensure you have the right components and follow safety instructions.
First, plan out your fence layout and mark boundary lines with stakes and string. Next, position posts in the ground or attach them to existing fences.
Connect insulated wires to each post using insulators and secure the wire at regular intervals throughout the fencing route.
Finally, install an energizer box along with its necessary components such as grounding rods, and connect it to a power source before turning on the electricity supply.
Tractor Supply Solar Electric Fence
Tractor Supply’s Solar Electric Fence is an easy-to-install, cost-effective way to protect your property from wandering animals. It uses solar energy to power the fence and can be used for both permanent and temporary fencing.
This type of electric fence is ideal for keeping horses, cattle, sheep, and other livestock in or out of specific areas on your property.
Additionally, it requires no wiring or digging since it runs off solar energy, making installation a breeze.
Solar Powered Electric Fence For Dogs
Solar-powered electric fences are an excellent way to keep your dog safe and secure in their own yard. This type of fence uses solar power to generate pulses of electricity that act as a barrier between your pet and the outside world, keeping them from wandering away or getting into areas where they don’t belong.
These fences are typically easy to install and maintain, with no need for costly wiring or expensive batteries.
Plus, they have the added benefit of being environmentally friendly due to their reliance on clean energy sources like sunlight!
American Farmworks Solar Electric Fence Instructions
American Farmworks Solar Electric Fence Instructions are an easy and efficient way to keep animals in or out of a designated area. With their solar-powered charging system, these fences provide up to five weeks of continuous power at full charge and require no external power source.
The American Farmworks Solar Electric Fence is simple to set up with just a few steps and minimal tools required, making it the perfect solution for keeping livestock safe while also conserving energy!
How Do You Install an Electric Fence Step by Step?
Installing an electric fence is a simple process that can be completed in just a few steps:
– Gather materials and tools needed for the installation, including an energizer, wires, and posts.
– Determine where to run the fence line based on your property boundaries or desired area.
– Place posts along the determined route for the electric fence.
– Connect one end of the fencing wire to the energizer then attach it to the first post with clips or staples. Run wire across remaining posts and secure it with clips or staples.
– Plug in energizer into a power source to test out the system. Make sure all connections are tightly secured before powering up.
With regular maintenance, an electric fence will last for many years providing effective security against intruders and animals alike!
Can I Install An Electric Fence Myself?
Yes, you can install an electric fence yourself.
Here are some tips to get started:
• Read the instructions that come with your electric fence kit thoroughly before beginning installation.
• Consult a professional if you have any questions or concerns about safety and compliance regulations in your area.
• Prepare the ground by clearing away debris and marking out where each component will be installed.
• Install grounding rods as per manufacturer’s instructions, then begin connecting sections of fencing wire together.
• Use insulators to ensure wires are properly insulated from posts and other potential conducting surfaces. With patience and careful preparation, installing an electric fence is within reach for most DIYers!
Does an Electric Fence Have to Make a Complete Loop?
No, an electric fence does not need to make a complete loop.
For proper function, the following requirements must be met:
– Electric fence must have a power source and energizer.
– The energizer sends pulses of electricity through the wires of the fence.
– Ground rods should be placed at regular intervals around the perimeter of the enclosure for maximum performance.
These components work together to form a working electric fence system that can contain animals and deter trespassers without forming a complete loop circuit.
What Are The Disadvantages of Solar Electric Fences?
Solar electric fences have some significant disadvantages, including
High installation costs – Purchasing and maintaining the components of a solar fence can be costly.
Dependence on sunlight – The system needs direct exposure to sunlight for power, so it may not be suitable in cloudy climates or areas with limited sun.
Short life span – Solar panels and batteries typically need to be replaced after five years or less due to wear and tear from weather conditions.
In summary, while solar electric fences are an appealing option because they are easy to install with no running costs, they also come at a higher upfront cost than other types of fencing systems and require frequent maintenance as parts deteriorate over time.
Conclusion
Installing a solar electric fence is an excellent way to protect your home, property, and livestock. It is easy to install and maintain with minimal costs, as it utilizes the sun’s energy for power. With proper installation and regular maintenance on the system, you can ensure that your home remains safe from intruders or predators.
In addition to providing physical protection, a solar electric fence provides peace of mind knowing that your home has an added layer of security in place.
Frequently Asked Questions (FAQs)
How to install an electric fence?
To install an electric fence, start by choosing the location and layout of your fence. Once you have identified the boundaries of your fence, you can determine the number and placement of fence posts and the length and type of fence wire you will need. Then, install the fence posts and insulators, attach the fence wire, install the solar panel and battery, connect the fence charger, test the fence, and maintain and monitor the fence regularly.
Which wire is used for solar fencing?
The wire used for solar fencing is usually made of steel or aluminum and is coated with a high-tensile polymer. This coating helps to protect the wire from corrosion and provides insulation to prevent the electrical charge from being grounded.
Are solar electric fences AC or DC?
Solar electric fences are usually DC (direct current) systems. They use a solar panel to convert sunlight into electrical energy, which is stored in a battery. The battery powers a fence charger, which converts the DC voltage into a high-voltage pulse that is sent through the fence wire to deter animals from coming into contact with the fence.
How does a solar electric fence work?
A solar electric fence works by using a solar panel to convert sunlight into electrical energy, which is stored in a battery. The battery powers a fence charger, which converts the DC voltage into a high-voltage pulse that is sent through the fence wire. When an animal comes into contact with the fence wire, the electrical charge causes a shock that deters the animal from crossing the fence. The fence charger continues to send pulses of electrical energy along the fence wire to deter animals from attempting to cross the fence.
