A bidet toilet seat is a convenient and hygienic addition to any bathroom. Not only does it provide a more thorough cleaning experience, but it also helps to reduce toilet paper waste. If you’re considering installing a bidet toilet seat in your home, you may be wondering where to start. Fortunately, the installation process is relatively straightforward and can be completed with just a few basic tools. In this article, we’ll walk you through the steps How To Install Bidet Toilet Seat, including what tools you’ll need and some tips to ensure a smooth installation process.
How To Install Bidet Toilet Seat (10 Easy Steps)
How To Install Bidet Toilet Seat is relatively easy and can be completed in just a few simple steps. Here’s what you need to do:
Here are the materials you will need to install a bidet toilet seat:
- Bidet toilet seat – Choose a bidet seat that fits your toilet bowl and has the features you desire, such as warm water or a heated seat.
- Adjustable wrench or pliers – You’ll need to use these tools to tighten nuts and bolts.
- Screwdriver – You may need a screwdriver to remove the existing toilet seat or to secure the bidet seat to the toilet bowl.
- Teflon tape – This tape can be wrapped around the threads of water supply connections to prevent leaks.
- Water supply hose – The bidet seat will require a water supply, so you’ll need a flexible hose to connect the seat to the water source.
- Bucket or towel – You’ll need something to catch any water that may spill during the installation process.
- Optional: GFCI outlet – If your bidet seat has electrical features, such as a heated seat or warm water, you may need to install a ground-fault circuit interrupter (GFCI) outlet near the toilet.
Step 1: Turn off the water supply
Before you begin, turn off the water supply to your toilet. You can do this by turning the shut-off valve, which is usually located near the base of the toilet or on the wall behind it. Flush the toilet to remove any water from the tank and bowl.
Step 2: Remove the existing toilet seat
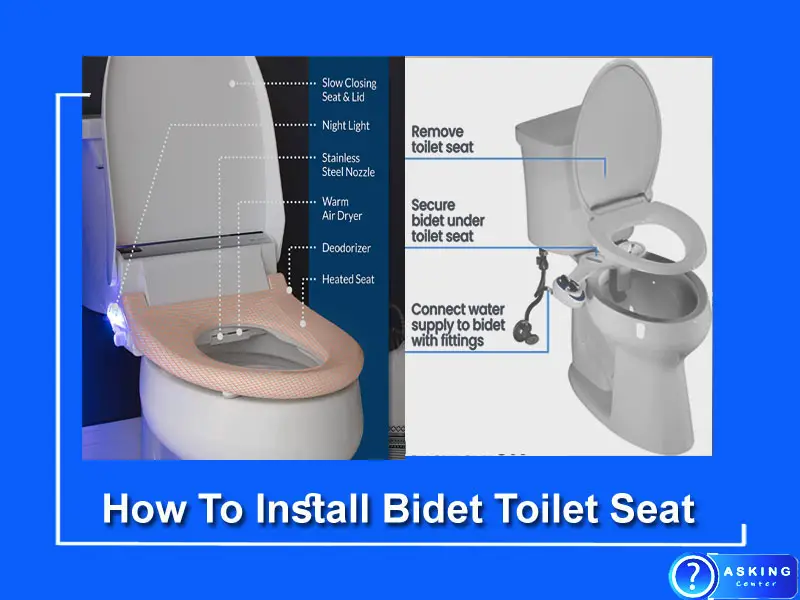
Most bidet seats are designed to fit on standard toilet bowls. Before you can install the new seat, you’ll need to remove the old one. To do this, locate the bolts that hold the seat in place. These are usually located at the back of the toilet seat, on the underside of the bowl. Use a screwdriver or pliers to remove the bolts, and lift the old seat away from the toilet.
Step 3: Install the mounting bracket
Next, you’ll need to install the mounting bracket that came with your bidet seat. The bracket is designed to hold the seat securely in place. To install it, place the bracket over the bolt holes on the toilet bowl, and align it with the holes in the bowl. Then, insert the bolts that came with the seat through the bracket and into the holes in the bowl. Tighten the bolts using a wrench or pliers. Be sure to follow the instructions that came with your seat for the specific bolt-tightening torque required.
Step 4: Connect the water supply
Now it’s time to connect the water supply to the bidet seat. Most bidet seats are designed to work with the existing water supply hose that connects to the toilet tank. To install the bidet seat, you’ll need to detach the existing hose from the toilet tank and attach it to the bidet seat’s inlet valve. Use a wrench or pliers to tighten the connection.
Step 5: Attach the bidet seat
Once the mounting bracket and water supply are in place, it’s time to attach the bidet seat. Most bidet seats come with a quick-release mechanism that makes it easy to attach and detach the seat from the mounting bracket. Simply align the seat with the bracket and snap it into place. Make sure it’s securely attached before moving on to the next step.
Step 6: Turn on the water supply
With the bidet seat in place, turn the water supply back on and let the tank fill with water. Check for leaks around the water supply connections and tighten any connections as needed. You may also want to check the bidet seat’s manual for instructions on how to adjust the water pressure and temperature to your liking.
Step 7: Test the bidet seat
Finally, it’s time to test out your new bidet seat! Sit on the toilet and activate the bidet function using the controls on the seat. Make sure the water is flowing properly and adjust the temperature and pressure as needed. If everything is working correctly, you’re done!
Optional Step: Install a GFCI outlet
If your bidet seat has electrical features, such as a heated seat or warm water, you may need to install a ground-fault circuit interrupter (GFCI) outlet near the toilet. A GFCI outlet will protect you from electrical shock if any water comes into contact with the electrical components of the seat. If you’re not comfortable installing an outlet yourself, hire a licensed electrician to do the job.
How To Install Kohler Bidet Toilet Seat
How To Install Kohler Bidet Toilet Seat is relatively easy and can be completed in just a few simple steps. Here’s what you need to do:
Step 1: Turn off the water supply
Before you begin, turn off the water supply to your toilet. You can do this by turning the shut-off valve, which is usually located near the base of the toilet or on the wall behind it. Flush the toilet to remove any water from the tank and bowl.
Step 2: Remove the existing toilet seat
Most Kohler bidet seats are designed to fit on standard toilet bowls. Before you can install the new seat, you’ll need to remove the old one. To do this, locate the bolts that hold the seat in place. These are usually located at the back of the toilet seat, on the underside of the bowl. Use a screwdriver or pliers to remove the bolts, and lift the old seat away from the toilet.
Step 3: Install the mounting bracket
Next, you’ll need to install the mounting bracket that came with your Kohler bidet seat. The bracket is designed to hold the seat securely in place. To install it, place the bracket over the bolt holes on the toilet bowl, and align it with the holes in the bowl. Then, insert the bolts that came with the seat through the bracket and into the holes in the bowl. Tighten the bolts using a wrench or pliers. Be sure to follow the instructions that came with your seat for the specific bolt-tightening torque required.
Step 4: Connect the water supply
Now it’s time to connect the water supply to the Kohler bidet seat. Kohler bidet seats come with a flexible water supply hose that connects to the bidet seat’s inlet valve. To install the bidet seat, detach the existing water supply hose from the toilet tank and attach the Kohler bidet seat’s water supply hose to the toilet tank. Use a wrench or pliers to tighten the connection.
Step 5: Attach the Kohler bidet seat
Once the mounting bracket and water supply are in place, it’s time to attach the Kohler bidet seat. Kohler bidet seats come with a quick-release mechanism that makes it easy to attach and detach the seat from the mounting bracket. Simply align the seat with the bracket and snap it into place. Make sure it’s securely attached before moving on to the next step.
Step 6: Turn on the water supply
With the Kohler bidet seat in place, turn the water supply back on and let the tank fill with water. Check for leaks around the water supply connections and tighten any connections as needed. You may also want to check the Kohler bidet seat’s manual for instructions on how to adjust the water pressure and temperature to your liking.
Step 7: Test the Kohler bidet seat
Finally, it’s time to test out your new Kohler bidet seat! Sit on the toilet and activate the bidet function using the controls on the seat. Make sure the water is flowing properly and adjust the temperature and pressure as needed. If everything is working correctly, you’re done!
Optional Step: Install a GFCI outlet
If your Kohler bidet seat has electrical features, such as a heated seat or warm water, you may need to install a ground-fault circuit interrupter (GFCI) outlet near the toilet. A GFCI outlet will protect you from electrical shock if any water comes into contact with the electrical components of the seat. If you’re not comfortable installing an outlet yourself, hire a licensed electrician to do the job.