SharkBite fittings have become increasingly popular in recent years as an alternative to traditional methods of plumbing installation. They are designed to make plumbing projects faster, easier, and more efficient. SharkBite fittings are a type of push-to-connect fitting that allows you to join two pipes without using any special tools or soldering equipment. This makes them a great choice for DIY enthusiasts or anyone looking to save time and money on their plumbing projects. In this guide, we will take you through the steps to install a SharkBite fitting, including the tools and materials you will need and some tips for ensuring a leak-free connection.
How To Install A Sharkbite Fitting | 10 Easy Steps
Installing a SharkBite fitting is a straightforward process that requires a few basic tools and materials. Here is a step-by-step guide on How To Install A Sharkbite Fitting:
Here are the materials you will need to install a SharkBite fitting:
- SharkBite fitting – Make sure you have the correct size and type of fitting for your project.
- Pipe cutter or hacksaw – You will need to cut your pipes to the correct length before installing the fittings.
- Deburring tool – Use this tool to remove any sharp edges or burrs left on the cut pipes.
- Tape measure or ruler – You will need to measure and mark the pipes before cutting.
- Clean cloth or rag – Use this to wipe down the pipes before installation to remove any debris or dirt.
- SharkBite depth gauge – This tool is used to measure the insertion depth of the fitting into the pipe.
- Pipe support brackets or clamps – These are used to secure the pipes in place.
- PEX tubing or copper pipe – Choose the type of pipe that is suitable for your project.
Step 1: Turn off the water supply
Before you start any plumbing project, it is important to turn off the water supply to the area where you will be working. This will prevent any accidents or water damage.
Step 2: Measure and mark the pipes
Measure and mark the pipes to the correct length for your project. Use a tape measure or ruler to make accurate measurements.
Step 3: Cut the pipes
Using a pipe cutter or hacksaw, cut the pipes to the correct length. Make sure the cut is straight and clean.
Step 4: Deburr the pipes
Use a deburring tool to remove any sharp edges or burrs left on the cut pipes. This will ensure a smooth insertion of the SharkBite fitting.
Step 5: Clean the pipes
Wipe down the pipes with a clean cloth or rag to remove any debris or dirt. This will ensure a clean and secure connection.
Step 6: Insert the SharkBite fitting
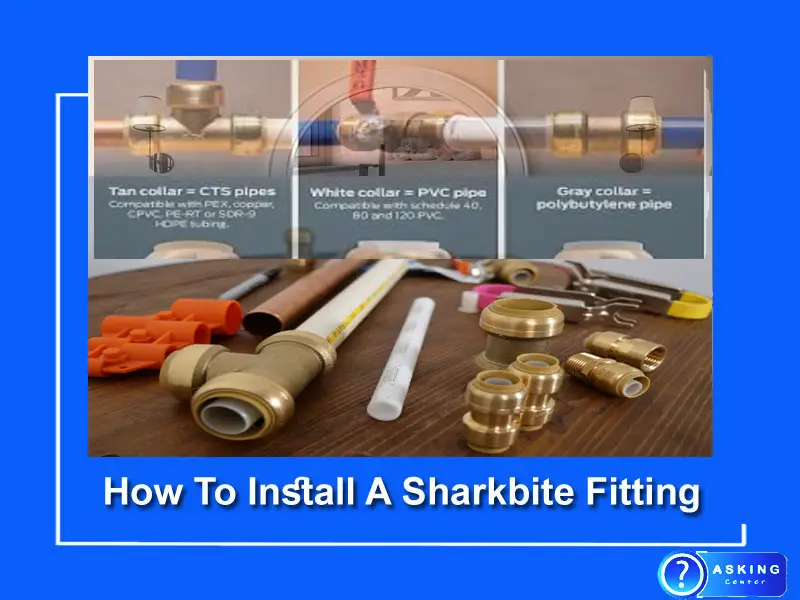
Push the SharkBite fitting onto the pipe until it reaches the insertion mark. Use a SharkBite depth gauge to ensure the fitting is inserted to the correct depth. The SharkBite fitting has a color code system that matches the size of the pipe, so make sure you choose the right fitting for the size of your pipe.
Step 7: Connect the second pipe
Insert the second pipe into the other end of the SharkBite fitting until it reaches the insertion mark. Make sure both pipes are inserted fully into the fitting to ensure a secure connection.
Step 8: Check the connection
Check the connection for leaks by turning the water supply back on and running water through the pipes. Check the connections for any signs of leaks or drips. If there are any leaks, turn off the water supply and double-check that the pipes are fully inserted into the fitting.
Step 9: Secure the pipes
Use pipe support brackets or clamps to secure the pipes in place. This will prevent any movement or stress on the connections.
Step 10: Test the connection again
After securing the pipes, turn the water supply back on and test the connection again for any leaks or drips. If everything is secure and leak-free, your SharkBite fitting is now installed and ready to use.
Tips for a successful SharkBite fitting installation:
Always follow the manufacturer’s instructions and safety guidelines when using SharkBite fittings.
- Use a clean cloth or rag to wipe down the pipes before installation to ensure a clean and secure connection.
- Make sure you have the correct size and type of fitting for your project.
- Use a SharkBite depth gauge to ensure the fitting is inserted to the correct depth.
- Double-check the pipes are fully inserted into the fitting to ensure a secure connection.
- Use pipe support brackets or clamps to secure the pipes in place and prevent any movement or stress on the connections.
- Test the connection for leaks before and after securing the pipes to ensure a leak-free installation.
How To Install Sharkbite Fittings On Copper
SharkBite fittings are an innovative type of push-to-connect plumbing fittings that make plumbing projects faster, easier, and more efficient. They are designed to work with a variety of different pipe materials, including copper, PEX, and CPVC. In this article, we will guide you through the steps to install SharkBite fittings on copper pipes.
Materials needed:
SharkBite fitting(s)
Copper pipe(s)
Pipe cutter or hacksaw
Deburring tool
Clean cloth or rag
SharkBite depth gauge
Pipe support brackets or clamps
Step 1: Turn off the water supply
Before you start any plumbing project, it is important to turn off the water supply to the area where you will be working. This will prevent any accidents or water damage.
Step 2: Cut the copper pipe
Using a pipe cutter or hacksaw, cut the copper pipe to the correct length for your project. Make sure the cut is straight and clean.
Step 3: Deburr the copper pipe
Use a deburring tool to remove any sharp edges or burrs left on the cut copper pipe. This will ensure a smooth insertion of the SharkBite fitting.
Step 4: Clean the copper pipe
Wipe down the copper pipe with a clean cloth or rag to remove any debris or dirt. This will ensure a clean and secure connection.
Step 5: Insert the SharkBite fitting onto the copper pipe
Push the SharkBite fitting onto the copper pipe until it reaches the insertion mark. Use a SharkBite depth gauge to ensure the fitting is inserted to the correct depth. The SharkBite fitting has a color code system that matches the size of the pipe, so make sure you choose the right fitting for the size of your copper pipe.
Step 6: Connect the second copper pipe
Insert the second copper pipe into the other end of the SharkBite fitting until it reaches the insertion mark. Make sure both copper pipes are inserted fully into the fitting to ensure a secure connection.
Step 7: Check the connection for leaks
Check the connection for leaks by turning the water supply back on and running water through the copper pipes. Check the connection for any signs of leaks or drips. If there are any leaks, turn off the water supply and double-check that the copper pipes are fully inserted into the fitting.
Step 8: Secure the copper pipes
Use pipe support brackets or clamps to secure the copper pipes in place. This will prevent any movement or stress on the connections.
Step 9: Test the connection again
After securing the copper pipes, turn the water supply back on and test the connection again for any leaks or drips. If everything is secure and leak-free, your SharkBite fitting is now installed on copper pipes and ready to use.
Conclusion
In conclusion, installing SharkBite fittings is a quick, easy, and efficient way to make plumbing repairs or installations. The push-to-connect system used by SharkBite fittings eliminates the need for special tools or skills like soldering or crimping, making it accessible to even novice DIYers.
When installing SharkBite fittings on copper pipes, it’s important to properly cut and deburr the pipe and ensure the fitting is fully inserted to the correct depth. SharkBite fittings are compatible with a variety of pipe materials, including copper, PEX, and CPVC, making them a versatile choice for plumbing projects. Overall, SharkBite fittings provide a reliable and convenient solution for anyone looking to make plumbing repairs or installations quickly and efficiently.