Installing a dimmer switch is a great way to add convenience and ambiance to your home lighting. A dimmer switch allows you to adjust the brightness of your lights, which can create a more comfortable and relaxing atmosphere. If you have a dimmer switch with 3 wires, the installation process may seem intimidating at first, but it’s actually quite simple. In this guide, we’ll walk you through the steps of how to install a dimmer switch with 3 wires, including what tools you’ll need and how to identify the wires. With a little bit of patience and some basic electrical knowledge, you can install a dimmer switch in no time.
How To Install A Dimmer Switch With 3 Wires
Installing a dimmer switch with 3 wires is a straightforward process that can be completed with just a few tools and a bit of electrical knowledge. Follow these step-by-step instructions How To Install A Dimmer Switch With 3 Wires in your home:
To install a dimmer switch with 3 wires, you’ll need a few basic tools and materials:
- Dimmer switch with 3 wires: Make sure you purchase a dimmer switch that is compatible with the type of light bulbs you have.
- Screwdriver: You’ll need a flathead screwdriver to remove the cover plate and screws from your existing switch.
- Wire stripper: Use a wire stripper to remove the insulation from the wires.
- Voltage tester: A voltage tester will ensure that the power is off before you start working on the switch.
- Electrical tape: Electrical tape can be used to secure the wires and prevent them from coming loose.
- Wire connectors: Wire connectors are used to connect the wires from the dimmer switch to the wires in the electrical box.
- Safety goggles: It’s always a good idea to wear safety goggles when working with electrical wiring to protect your eyes from any flying debris.
- Instruction manual: Make sure to read the instruction manual that comes with your dimmer switch to ensure that you install it correctly and safely.
Step 1: Turn off the power
Before you begin any electrical work, make sure to turn off the power to the switch. Locate your home’s electrical panel and find the circuit breaker that controls the switch you’ll be working on. Flip the switch to the “off” position and then test the switch with a voltage tester to ensure that there is no electrical current flowing through the wires.
Step 2: Remove the existing switch
Once you’ve verified that the power is off, remove the cover plate and screws from the existing switch with a screwdriver. Gently pull the switch out from the electrical box and disconnect the wires from the screws on the back of the switch. Depending on your switch, you may need to use pliers or a screwdriver to loosen the wires.
Step 3: Identify the wires
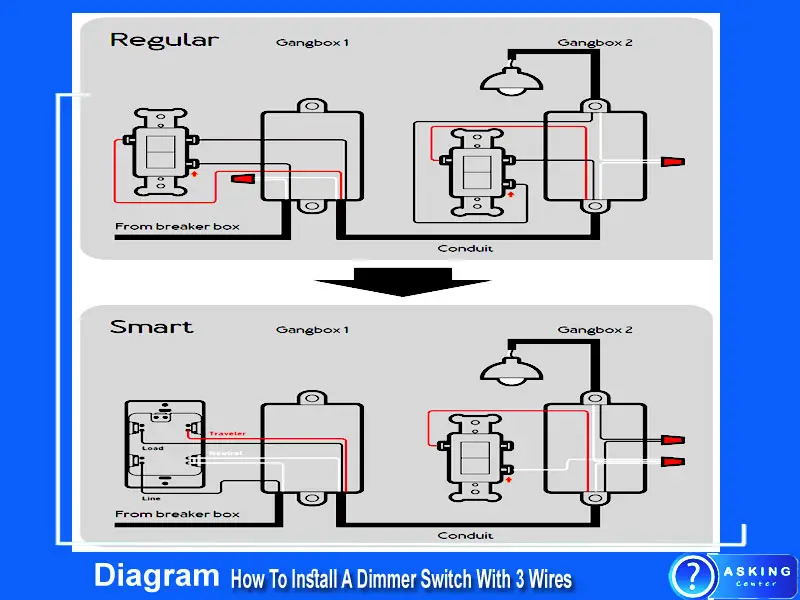
There are three wires that will be connected to the dimmer switch: a black “hot” wire, a white “neutral” wire, and a green or bare copper “ground” wire. Identify these wires in the electrical box by their color and location. The black wire is usually connected to the top screw, the white wire to the bottom screw, and the ground wire to a green screw or metal clip.
Step 4: Connect the wires to the dimmer switch
Connect the wires from the electrical box to the corresponding wires on the dimmer switch. Begin by wrapping the end of each wire clockwise around the appropriate screw terminal on the switch. Tighten the screw with a screwdriver to secure the wire in place.
The black wire from the electrical box should be connected to the black wire on the dimmer switch. The white wire from the electrical box should be connected to the white wire on the dimmer switch. The green or bare copper wire from the electrical box should be connected to the green screw or metal clip on the dimmer switch.
Step 5: Secure the wires
Use wire connectors to secure the wires together and prevent them from coming loose. Screw on the wire connectors clockwise until they are snug and tight.
Step 6: Attach the dimmer switch to the electrical box
Once the wires are securely connected, carefully tuck them back into the electrical box. Attach the dimmer switch to the box using the screws that came with the switch. Make sure the switch is level and flush against the wall.
Step 7: Test the switch
Turn the power back on at the electrical panel and test the dimmer switch to ensure that it is working properly. If the switch is not functioning correctly, turn off the power and double-check the wiring.
Step 8: Install the cover plate
Finally, install the cover plate over the switch and screw it in place. Turn on the lights and adjust the dimmer switch to your desired brightness level.
Congratulations, you’ve successfully installed a dimmer switch with 3 wires! Remember to always follow safety guidelines and turn off the power before working on any electrical components.
How To Install A Dimmer Switch With 2 Wires
Installing a dimmer switch with two wires is relatively straightforward and can be done in just a few steps. First, turn off the breaker that controls your light circuit and then disconnect the existing switch from the power source. Next, connect one of the black wires to either side of the dimmer switch – as long as both connections are secure you don’t need to worry about which wire goes where.
Finally, attach the bare copper ground wire from your house wiring to a green grounding screw on the dimmer and then reattach it to your power source before turning on your circuit breaker again.
How To Install A Leviton Dimmer Switch With 4 Wires
Before attempting to install a Leviton dimmer switch with four wires, it is important to make sure that your home’s wiring meets the minimum requirements for such a device. This will include making sure you have the correct voltage (120 VAC) and amperage rating for the dimmer. Additionally, you’ll need access to two black “hot” wires, one white neutral wire, and one green ground wire.
Once these conditions are met, installation can begin by turning off the power at the circuit breaker and connecting each of these four wires in their appropriate places on the dimmer switch before securing it into place.
How To Install A Dimmer Switch With 4 Wires
Installing a dimmer switch with 4 wires can be simple and straightforward. All you need is the appropriate tools, wire strippers, electrician’s tape, screwdrivers, and an adjustable wrench. Start by turning off the power to the circuit at your breaker box.
Next, remove the existing wall plate and unscrew the two screws that hold the switch in place. Carefully disconnect all four wires from the existing switch then strip away some of their insulation using your wire stripper tool so they’re ready for wiring up to your new dimmer switch. Finally attach each wire to its designated spot on your new dimmer, making sure you use electricians’ tape on any exposed copper wiring before securing it into place with a screwdriver or an adjustable wrench for extra support.
How To Install A Lutron Dimmer Switch With 4 Wires
Installing a Lutron dimmer switch with 4 wires is an easy job that can be done in just a few simple steps. First, shut off the power to the circuit at your fuse box or service panel. Next, disconnect all of the existing wirings from your current light switch and connect it to the terminals on your new Lutron dimmer switch—red wire to one terminal, black wire to another terminal, white wire (neutral) to neutral bar, and green/bare copper wire (ground) to ground bar.
Finally, mount your new Lutron dimmer switch into place using the screws provided with it and turn the power back on at the service panel.
How To Install Dimmer Switch Led
Installing a dimmer switch for LED lighting is relatively easy and can be done without an electrician. All that’s needed is the correct dimmer switch, which should be compatible with your type of LED. With the appropriate tools, you’ll want to start by turning off the power at the breaker box before removing your existing light switch and connecting the new one in its place.
You will then need to connect all of your wires from the wall to the switch according to their markings or colors, then secure them into place. Once everything has been installed properly, turn on your power again and enjoy controlling your LED lights with a dimmer!
Why Are There 3 Wires On My Dimmer Switch?
A dimmer switch has three wires to provide power, enable the dimming feature, and create a neutral connection.
These wires ensure:
– Power is supplied from an independent source.
– The dimmer switch can be used to adjust light levels.
– A secure ground for safety purposes.
Without these three wires, your dimmer switch would not be able to function correctly or safely.
How Do You Install A 3-wire Lutron Dimmer Switch?
Installing a 3-wire Lutron dimmer switch is relatively simple and can be completed in just a few steps.
• Turn off the power to the circuit at the breaker box.
• Remove the existing switch from the wall plate and disconnect the wires.
• Connect the white wire from the wall to the common terminal on the dimmer switch.
• Connect one black wire to either the “line” or “load” terminal, depending on setup.
• Connect the second black wire to the remaining terminal (not used with single pole switches).
• Attach ground wire if present according to manufacturer’s instructions.
• Securely mount the dimmer switch into the wall plate using included screws and turn the power back on.
Once these steps are followed correctly, your new 3-wire Lutron dimmer switch should operate properly in no time!
How Many Wires Are Needed for a Dimmer Switch?
A dimmer switch requires three wires: a hot wire (black or red), a neutral wire (white), and a ground wire (green). These wires are used to provide electricity to the dimmer switch, allowing you to control the intensity of light in the room.
• Hot Wire: Carries current from the power source.
• Neutral Wire: Completes electrical circuit.
• Ground Wire: Protects against electrical shocks.
Conclusion
Installing a dimmer switch with 3 wires is a relatively simple process that can be completed in under an hour. With the right tools and materials, anyone can install a dimmer switch successfully. After installation, you will have the ability to control your lighting levels for any desired ambiance.
This project is great for those looking to update their home’s lighting system and save money on energy bills.