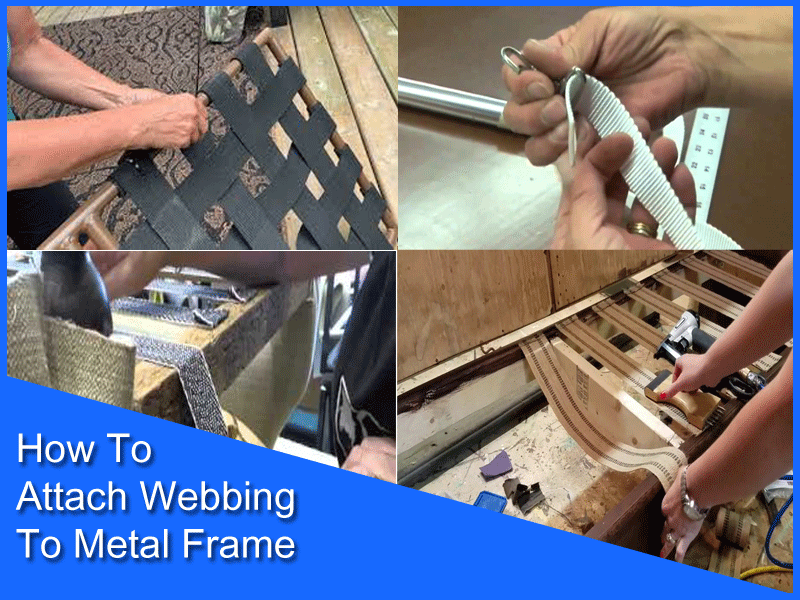
There are a few different ways that you can attach webbing to a metal frame. The most common way is to use rivets. You will need to use a drill to make a hole in the metal frame, and then use a rivet gun to insert the rivet through the webbing and metal frame.
You can also use screws or bolts to attach the webbing to the metal frame.
- Place the webbing on the metal frame
- Use a hammer to tap the webbing into place
- Use a screwdriver to secure the webbing in place
- Repeat steps 2 and 3 until the webbing is securely attached to the metal frame
How To Attach Webbing To Metal Frame
There are a lot of ways How To Attach Webbing To Metal Frame. One of the most common ways to attach webbing to metal is by using grommets. Grommets are small metal rings that can be inserted into holes in the fabric. You can then thread the webbing through the grommets and tie it off, creating a secure connection.
Another option is to use rivets. Rivets are small metal fasteners that are inserted through both the webbing and the metal. They can be hammered or crimped into place, creating a strong bond.
You can also use screws and bolts to attach webbing to metal. Simply thread the webbing through the holes in the metal and screw or bolt it into place. This is a very secure connection, but it can be more difficult to adjust if you need to make changes later on.
Finally, you can also use adhesive to attach webbing to metal. This is a quick and easy option, but it may not be as strong as other methods. Whichever method you choose, make sure that the webbing is securely attached to the metal before using it.
Step 1: How Do You Attach Webbing Straps?
There are a few different ways that you can attach webbing straps, depending on what you are using them for. If you are looking to attach webbing straps to a piece of gear or clothing, you will first need to determine what kind of attachment point you have. Common attachment points include D-rings, loops, and grommets.
Once you have determined the attachment point, you can then choose the best method for attaching the webbing strap. One common method is to simply thread the webbing strap through the attachment point and then tie it off. This method works well for smaller attachment points but can be difficult to do with larger ones.
Another method is to use a quick-release buckle. This method is quick and easy but can be less secure than other methods. If you need a more secure attachment, you can sew the webbing strap to the attachment point.
This is a strong and permanent attachment but can be more difficult to do. You can also use rivets to attach the webbing strap. This is a quick and easy method but can be less secure than other methods.
No matter what method you choose, make sure that the webbing strap is attached securely so that it does not come loose.
Step 2: How Do You Attach A Webbing To A Chair Frame?
If you’re looking to add some webbing to a chair frame, there are a few things you’ll need to do. First, you’ll need to remove any old webbing or fabric from the frame. Next, you’ll need to measure the frame to determine how much webbing you’ll need.
Once you have your webbing, you’ll need to attach it to the frame. This can be done with staples, tacks, or upholstery nails. Be sure to attach the webbing evenly around the frame, and don’t forget to add a few extra inches so you can wrap it around the corners.
When you’re finished, you can trim off any excess webbing and replace the fabric or upholstery.
Step 3: How Do You Use Webbing Clips?
Webbing clips are an essential piece of gear for any serious hiker or camper. They are incredibly versatile and can be used for a variety of purposes.
Here are a few tips on how to use webbing clips:
1. Use them to clip webbing to your backpack. This is a great way to add extra gear to your pack or to secure loose straps.
2. Use them to create a makeshift clothesline. Webbing clips are perfect for hanging wet clothes and towels to dry.
3. Use them to secure a tarp or tent. In bad weather, a few well-placed webbing clips can keep your shelter in place.
4. Use them as a replacement for lost or damaged shoelaces. If your shoelaces break, webbing clips can be used to temporarily hold your shoes together.
5. Use them to create a makeshift splint. If you injure yourself on the trail, webbing clips can be used to immobilize the injury. Webbing clips are an incredibly versatile piece of gear. With a little creativity, they can be used for all sorts of things.
So, next time you’re packing for a hike or a camping trip, be sure to bring along a few webbing clips.
How To Attach Webbing To A Metal Chair
If you’re looking to add some webbing to a metal chair, there are a few things you’ll need to do. First, you’ll need to measure the width of the chair and cut your webbing to size. Next, you’ll need to attach the webbing to the chair using either staples or screws.
Once the webbing is attached, you can then add a foam pad and fabric to the seat of the chair. This will give you a comfortable place to sit and will also help to prolong the life of your chair.
Chair Webbing Alternative
If you’ve ever had a chair with sagging webbing, you know how frustrating it can be. The webbing is essential to the structure of the chair, and when it starts to fail, the whole chair can feel like it’s falling apart. There are a few ways to repair or replace chair webbing, but one of the best alternatives is to use an elastic band.
Elastic bands are strong and stretchy, so they can provide the support that chair webbing needs. They’re also relatively inexpensive and easy to find. To use an elastic band as a chair webbing alternative, you’ll need to remove the old webbing and staples.
Then, cut the elastic band to the right size and staple it in place. You can also use adhesive tape to secure the elastic band. If your chair has sagging webbing, don’t despair.
There are a few different ways to fix it, including using an elastic band. With a little bit of effort, you can make your chair as good as new.
Metal Webbing Clips
If you’re in need of a versatile, heavy-duty fastener, look no further than metal webbing clips. These clips are commonly used in a variety of industries, including construction, automotive, and marine. Metal webbing clips are made from high-strength steel and are designed for use with thick webbing.
They are ideal for securing load-bearing straps and can be used in a variety of applications, including cargo tie-downs, tow straps, and lifting slings. Metal webbing clips are available in a variety of sizes and configurations. The most common type is the J-hook clip, which features a hook-shaped end that is inserted into a slot in the webbing.
Other popular types include S-hook clips and D-ring clips. When choosing metal webbing clips, it is important to select the right size and style for your application. J-hook and S-hook clips are available in a range of sizes, from small to large.
D-ring clips are available in both standard and heavy-duty versions. If you’re looking for a durable, heavy-duty fastener, metal webbing clips are a great option. They are available in a variety of sizes and styles and can be used in a variety of applications.
Webbing Stretcher
If you’ve ever been rock climbing, you know that one of the most important pieces of gear is a webbing stretcher. This simple device is used to help climbers get up difficult routes by providing a little extra slack in the webbing. Webbing stretchers come in a variety of sizes and shapes, but they all serve the same purpose.
To use a webbing stretcher, simply clip it onto the webbing between your anchor and your belay device. As you pull up on the webbing, the stretcher will take up the slack, giving you a few extra inches of rope to work with. Webbing stretchers are a must-have for any serious climber, and they can be a lifesaver on difficult routes.
Be sure to pick up a few before your next climbing trip!
How To Use A Webbing Stretcher
If you’re looking to get a great workout in, using a webbing stretcher is a great way to do it!
Here’s how to use one:
1. Start by securing one end of the webbing to a sturdy object.
2. Next, step on the webbing with one foot, and then bring your other foot up so that both feet are on the webbing.
3. Now, start walking forward, stretching the webbing as you go.
4. You can increase the intensity of your workout by walking faster, or by adding weight to your backpack.
5. To finish, simply reverse your steps and walk back to the starting point. Webbing stretchers are a great way to get a full-body workout in, and they’re also very portable, so you can take them with you wherever you go!
Upholstery Webbing
Upholstery webbing is a type of fabric that is used to support the upholstery on furniture. It is typically made from cotton or jute and is woven into a grid-like pattern. The webbing is then attached to the frame of the furniture using tacks, staples, or adhesive.
Upholstery webbing is an important part of furniture construction as it provides support for the upholstery and helps to keep the fabric in place. It is available in a variety of widths and can be custom-ordered to fit the dimensions of your furniture. When choosing upholstery webbing, it is important to select a width that will provide adequate support for the weight of the upholstery.
For example, lighter-weight fabrics may require a narrower width of webbing while heavier fabrics may need a wider width. Upholstery webbing is a versatile and affordable option for supporting upholstery on furniture. It is available in a variety of widths and can be custom-ordered to fit the dimensions of your furniture.
When selecting upholstery webbing, be sure to choose a width that will provide adequate support for the weight of the upholstery.
Upholstery Webbing Types
If you’ve ever had a piece of furniture reupholstered, you may have noticed that the technician started by attaching webbing to the frame. Upholstery webbing is a key component in many upholstered pieces, providing both support and shape. There are many different types of webbing available, each with its own specific purpose.
Here’s a quick guide to the most common types of upholstery webbing:
Jute webbing: Jute webbing is made from natural fibers and is often used in antique furniture. It’s also the least expensive type of webbing.
Hemp webbing: Hemp webbing is similar to jute webbing but is slightly more durable. Cotton webbing: Cotton webbing is a good choice for light-use furniture. It’s not as strong as other types of webbing but is less expensive.
Polyester webbing: Polyester webbing is a synthetic fiber that is strong and durable. It’s often used in commercial furniture. Nylon webbing: Nylon webbing is the strongest type of webbing and is often used in outdoor furniture.
Now that you know a little more about upholstery webbing, you can make a more informed decision about which type is right for your needs.
How To Measure Pirelli Webbing
If you’re looking for a quick and easy way to measure Pirelli webbing, you’ve come to the right place. In this blog post, we’ll show you how to measure Pirelli webbing in just a few simple steps. First, you’ll need a measuring tape.
Place the measuring tape at one end of the Pirelli webbing, and then stretch it out to the other end. Make sure to measure the webbing at its widest point. Next, you’ll need to determine the width of the webbing.
To do this, simply measure the width of the webbing at its narrowest point. Finally, you’ll need to calculate the circumference of the webbing. To do this, simply multiply the width of the webbing by 2.
That’s all there is to it! Measuring Pirelli webbing is a quick and easy process that anyone can do.
You might also like
- How To Hide Radon Pipe In Basement
- Should I Buy A House With Radon Mitigation System
- How To Lock A Push Bar Door From The Outside
Conclusion
In this post, the author shows how to attach webbing to a metal frame using a few simple tools. First, the webbing is cut to size and then sewn together at the edges. Next, a strip of webbing is looped through the metal frame and the ends are sewn together.
Finally, the webbing is attached to the frame using rivets or bolts. The author provides detailed instructions and photos to help readers complete this project.